You’ll pick a Russet or Yukon Gold, scrub and dry it, rub with oil, season, and pierce for steam release. Set the oven to 400–425°F and bake 45–60 minutes until a skewer slides in and the center reaches about 205–210°F. Follow simple finishing steps and you’ll get crisp skin and a fluffy interior—here’s how.
Key Takeaways
- Choose uniform russet potatoes for fluffy interiors, or Yukon Gold for a creamier texture; select similar sizes within ±20% mass.
- Inspect and remove eyes or sprouts, scrub under cold water with a stiff brush, then pat dry with a lint-free towel.
- Rub each potato with about 1 tablespoon high-smoke-point oil, prick skin with a fork, and sprinkle coarse salt for crisping.
- Preheat oven to 400–425°F (200–220°C), place potatoes single-layer on a rack or baking sheet, and bake 45–60 minutes (larger may need 90).
- Check doneness with a skewer or instant-read thermometer; target core 205–210°F (96–99°C) or fork-tender with slightly split, browned skin.
Choosing the Right Potato
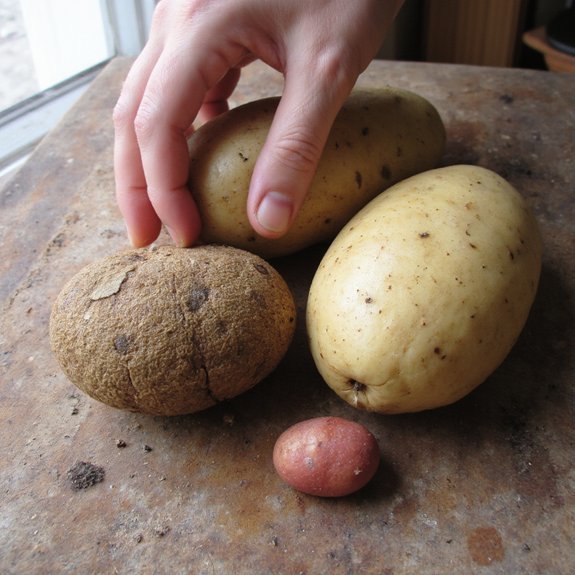
Starch content determines baking performance. You’ll choose tubers by intended texture: high-starch Russet potatoes yield dry, fluffy interiors and crisp skins; medium-starch Yukon gold produce moist, creamy flesh and thinner skins. For loaded-baked or mashed targets pick Russets for maximal starch gelatinization and minimal moisture retention. For buttery, single-ingredient presentations opt for Yukon gold to preserve emulsion and spoonable structure. Consider size uniformity to standardize heat transfer and doneness time; select specimens within ±20% mass. Inspect skin integrity and eye depth—shallow eyes reduce trimming waste and improve yield. Evaluate storage history when possible: cold storage increases reducing sugars, accelerating Maillard browning at the surface. If you’ll innovate with fillings or precision cooking, match potato selection to thermal profile and desired mouthfeel. You’ll reduce variability by specifying cultivar, average mass, and target starch category before beginning bake workflows. You’ll record choices to replicate outcomes across iterative experiments and time.
Preparing and Washing Potatoes
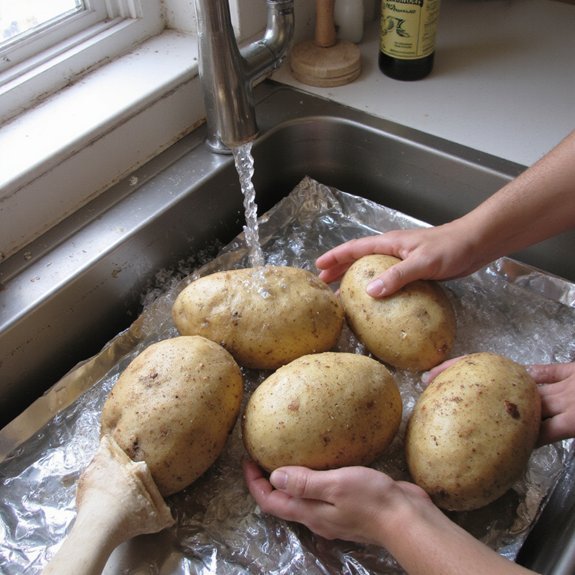
You’ve selected the right tubers; now prepare them for even heating and clean surfaces. Inspect each potato for defects, eyes, or sprouts; remove with a paring knife. Standardize size within a batch by trimming or grouping similar potato varieties to guarantee uniform cook time. Rinse under cold running water, rubbing with a stiff-bristled brush to dislodge soil. Adopt washing techniques that minimize bruising: support the tuber in your palm, apply gentle linear strokes, and avoid agitation that causes abrasion. Pat dry with a lint-free towel to remove surface moisture that hinders oven crisping. If you plan to store prepped potatoes briefly, lay them single-layer on a cooling rack to keep airflow and prevent condensation. For precision cooking, label batches by variety and size; this lets you calibrate time and temperature iteratively. You’ll reduce variability and innovate consistent, repeatable baked potato outcomes. You’ll achieve replicable results across ovens reliably.
Seasoning and Oiling the Skin
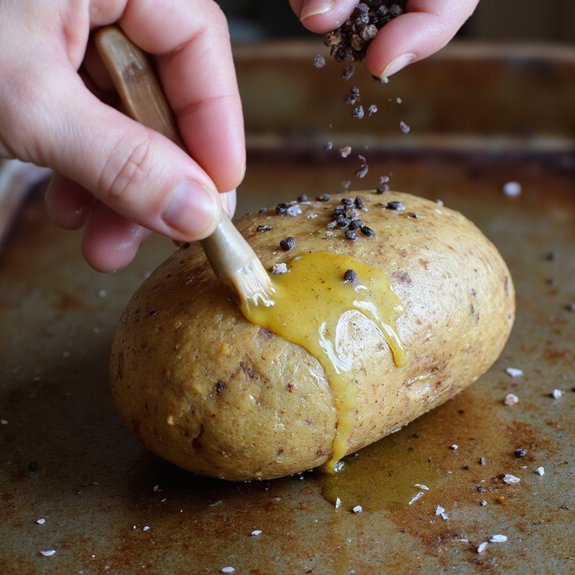
1 tablespoon of oil per medium potato and a light dusting of coarse salt are all you need to promote even browning and a crisp, flavorful skin. Rub oil over the surface, ensuring even coverage; poke skin with a fork to allow steam release. Use oils with a high smoke point for predictable browning. Apply coarse salt to create micro-abrasion that improves skin texture and draws moisture for a crisp finish. For flavor enhancement, add cracked pepper, garlic powder, or smoked paprika sparingly; they concentrate on the surface and won’t penetrate deeply. Implement consistent mass and surface area—uniform size yields reproducible results.
| Component | Purpose |
|---|---|
| Oil (1 tbsp) | Promote browning, improve skin texture |
| Salt & seasoning | Flavor enhancement, draw moisture |
Pat excess oil off if pooling. Place potatoes on a rack for airflow. You’ll get consistent, innovative results focused on controlled surface reactions. Document your variables for iterative improvement.
Oven Temperature and Baking Time
For a reliably fluffy interior and crisp skin, bake medium (5–7 oz / 140–200 g) potatoes at 400–425°F (200–220°C) for about 45–60 minutes; larger potatoes need 60–90 minutes. Use a consistent oven setting — conventional dry heat produces predictable conduction from skin to core; convection at the lower end of the range accelerates heat transfer and reduces baking duration by roughly 10–15%. Position potatoes on a rack or sheet to allow even airflow and avoid crowding. Preheat fully so the setpoint is stable when you load.
Choose an oven settings protocol that fits your workflow: conventional for uniform browning, convection for throughput, or a hybrid program to control surface crispness without overcooking. Track baking duration precisely with a timer and log iterations when you adjust size, salt, or oil variables. Small procedural changes yield measurable textural innovation; iterate systematically to optimize results. You’ll refine technique through controlled experimental runs.
Checking for Doneness
How do you confirm a potato’s done? You use targeted checking methods: probe, squeeze, and thermometer. Insert a thin metal skewer or fork into the center; minimal resistance indicates a soft interior. For tactile feedback, don’t squeeze hard — apply gentle pressure with oven mitted fingers; a pliant skin with springy flesh signals completion. Use a digital instant-read thermometer for objective data: 205–210°F (96–99°C) at the core is ideal for fluffy starch gelatinization. Combine instrument readings with visual cues: an evenly browned, slightly blistered skin and a tiny split at the stem denote internal steam pressure has released. If you want uniform doneness across multiple potatoes, sample the largest tuber rather than the smallest. If measurements are marginal, return to the oven for 5–10 minute increments, rechecking after each interval. Document your time, temperature, and observables to refine future bakes. Iterate parameters to innovate consistent, replicable results quickly.
Topping and Serving Ideas
A finished baked potato becomes a platform for balanced contrasts: pair a fluffy core with a hot protein, a cool creamy element, an acidic note, and a crunchy garnish. You’ll assemble toppings to optimize texture and flavor: select a hot protein, a cool dairy, an acid and a crisp element. For cheese options, choose melting (cheddar, fontina) or crumbly (feta, cotija). For herb varieties, prefer high-impact leaves (chive, dill, cilantro) applied finely. Keep proportions: 2:1:0.5:0.25 (potato:protein:cream:acid) by volume for balance. Temperature contrast matters; add hot components first, cool last. Use crunchy garnish for mouthfeel: toasted seeds, fried shallot, or panko. For plating, center potato, stack protein, pipe creamy element, drizzle acid, finish with garnish and microherbs. Adjust salt after assembly.
| Component | Examples |
|---|---|
| Protein | Pulled chicken, smoked salmon |
| Crunch/Garnish | Crispy bacon, toasted seeds |
Finish with a note: iterate ratios to innovate within constraints. You’ll refine profiles through iterative testing.
Reheating and Storing Leftovers
After assembling toppings you’ll often have leftovers; proper storage and reheating preserve texture and food safety. For storing leftovers, cool to room temperature within two hours, then seal in airtight containers or vacuum bags; refrigerate at ≤4°C up to four days. For longer storage freeze whole or mashed potatoes in vacuum-sealed or tightly wrapped packs up to three months; texture may change. When selecting reheating methods prioritize even heat and moisture control: oven at 175°C (350°F) wrapped in foil 20–30 minutes, or convection for faster, crisper skin. Reheat sliced or diced potatoes in a preheated skillet with a small amount of oil for browning. For rapid reheating use a microwave on medium power, then finish in a hot oven or skillet. Always reheat to an internal temperature of 74°C (165°F) and discard if off-odors or slime appear. Consider rapid sous-vide reheating for uniform results, reducing moisture loss consistently.