You can boil eggs perfectly by controlling age, water temperature, and cook time. Don’t rely on rolling boils or guesswork; use a gentle simmer and precise minutes for the yolk you want. You’ll save time and avoid green rings, and there are specific techniques for peeling and altitude adjustments that make the difference.
Key Takeaways
- Use egg size and freshness to set cook times; weigh eggs and date-stamp inventory for consistent results.
- Choose cold-start to minimize cracking or boiling-start for precise yolk control and faster throughput.
- Maintain a gentle simmer (≈85–92°C) and cook large eggs 4–6 min soft, 7–9 min medium, 10–12 min hard.
- Immediately shock eggs in an ice bath, then refrigerate within two hours at ≤4°C; unpeeled eggs last up to seven days.
- For easier peeling, use 7–10 day old eggs or add 1 tsp baking soda per liter, and avoid overcooking to prevent green yolk rings.
Why Egg Size and Freshness Matter
Egg size and freshness directly change the thermal and chemical behavior of an egg during boiling. You’ll calibrate time and heat transfer: larger eggs have greater mass, so conduction and convective boundary layers demand longer thermal penetration; size matters for target core temperature and coagulation kinetics. Egg freshness alters pH and albumen viscosity; fresher eggs exhibit lower pH, tighter membranes, and reduced separation between white and yolk, which affects diffusion and air cell volume. You’ll adjust expectations for peelability and texture because older eggs’ higher pH weakens albumen-to-shell bonding, easing shell removal but changing yolk firmness. For precision, measure egg mass and date-stamp inventory, then map seconds-per-gram to desired doneness and intended application (salad, slicing, preservation). You’ll leverage sensors or calibrated timers rather than heuristics. This disciplined approach reduces batch variability and supports iterative optimization for novel culinary processes. You’ll achieve reproducible results across scaled production runs consistently.
Choosing Between Cold-Start and Boiling-Start Methods
You can use a cold-start: it minimizes cracking and produces gentler heat transfer but makes final doneness less predictable across sizes. Or you can use a boiling-start: it demands strict timing from the moment water returns to a boil to produce precise yolk textures. You’ll need to weigh these trade-offs and apply method-specific timing tables for consistent results.
Cold-Start Pros and Cons
Although starting eggs in cold water slows thermal shock and yields more consistent whites, it also prolongs total cook time and reduces control over final yolk texture. You’ll prefer cold start when shell integrity and egg durability matter; gradual heating minimizes cracking and white separation. Drawbacks: slower cycles, harder timing for precise yolk gels, slightly lower throughput in batch processes. Use a low, monitored heat ramp and timers to mitigate variability. Test iterations to refine parameters for your equipment.
| Benefit | Trade-off |
|---|---|
| Reduced cracking, improved egg durability | Longer cook time |
| Consistent whites | Less precise yolk control |
Apply data-driven adjustments; iterate and record results for reproducible, innovative outcomes. Measure temperature curves and log variables to optimize protocol for scale now.
Boiling-Start Timing Tips
How should you pick timing when switching between cold-start and boiling-start methods? You’ll base the choice on control, throughput, and final texture.
- Calibrate single test for target doneness.
- Record start temp, boil intensity, and residence time.
- Adjust for egg size, batch, and altitude.
For boiling-start, bring water to a vigorous boil, add eggs gently, start a precise timer, then reduce to a simmer; that workflow gives repeatable results for intentional egg preparation. Use timing guidelines tied to egg size and temperature: 6–7 minutes for soft-set yolks from refrigerated large eggs, 9–10 for medium, 12 for hard. Validate and iterate; automate consistency with sensors or smart timers to eliminate guesswork and scale across kitchens. Maintain log files for continuous improvement and reproducibility.
Exact Timings for Soft, Medium, and Hard Yolks
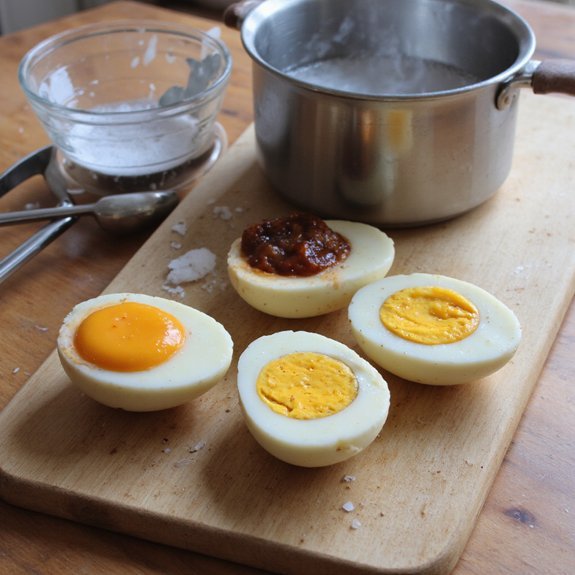
Set a timer: 4–6 minutes for soft yolks, 7–9 minutes for medium, and 10–12 minutes for hard. These times assume you add eggs to gently boiling water at sea level; increase times slightly for higher altitudes or if you start from cold. When the timer ends, transfer eggs to an ice bath immediately to halt cooking and lock in the targeted yolk texture.
Soft Yolks: 4–6 Minutes
Timing is critical: for large eggs you’ll boil 4 minutes for fully runny yolks, 5 minutes for slightly jammy centers, and 6 minutes for creamier but set yolks. You’ll use an immediate ice bath to halt residual cooking and guarantee repeatable texture. Use consistent water volume, starting temperature, and lid state; small deviations shift outcome. Soft yolk benefits include enhanced mouthfeel, emulsification for sauces, and quicker integration into dishes. For precision, calibrate one test egg and adjust by 15–30 seconds per elevation change. Handle gently to avoid white tearing. Serving suggestions: halve and season, place atop bowls, or blend into vinaigrettes. Record your stove-specific time and procedure; iterate until you reach your target yolk profile reliably. Repeat tests weekly for consistent innovative results only.
Medium Yolks: 7–9 Minutes
For large eggs boiled and plunged into an immediate ice bath, 7 minutes yields a soft but slightly jammy yolk, 8 minutes produces a classic jammy center with creamy edges, and 9 minutes gives a mostly set, tender yolk with only a faintly soft core. You’ll calibrate timing to altitude and egg size; use large as baseline.
| Time | Texture | Use |
|---|---|---|
| 7–8 min | Soft to jammy | Salads, bowls |
| 9 min | Mostly-set | Sandwiches, plating |
Medium yolks benefits include versatile texture for salads, bowls, and sandwiches; they balance spreadability and structure. For ideal serving, peel promptly and serve chilled or gently warmed to preserve texture. Use precise timers, test one egg, and iterate in 15–30 second increments to achieve consistent, innovative results each cooking session.
Hard Yolks: 10–12 Minutes
When you need fully cooked yolks for slicing or recipes that require no softness, boil large eggs and plunge them into an immediate ice bath at these benchmarks: 10 minutes yields a firm yolk with a faintly creamy core, 11 minutes produces an evenly firm yet still slightly moist center, and 12 minutes gives a completely set, dry yolk ideal for deviled eggs or finely crumbled salads.
You’ll use consistent boiling technique: start eggs in cold water, bring to a rolling boil, reduce to a gentle simmer and start egg timing. Adjust for elevation and egg size. For precise, repeatable results, log your variables.
- 10 min: firm with faint creaminess
- 11 min: evenly firm, slightly moist
- 12 min: fully set, dry
How Altitude Changes Cooking Time
Because air pressure falls with altitude, water’s boiling point drops roughly 1°C per 285 m (1°F per 500 ft). You must account for altitude adjustments and basic cooking chemistry: lower boil temp reduces heat transfer, so you increase time to reach desired egg coagulation. Use incremental timing: add 1–2 minutes per 300 m elevation as a starting rule, then refine by testing.
| Elevation | Boil Temp ≈ | Time Increase |
|---|---|---|
| Sea level (0 m) | 100°C | +0 min |
| 1500 m | 95°C | +3–4 min |
| 3000 m | 90°C | +6–8 min |
Measure outcomes, document results, and calibrate for egg size and starting temperature. You’ll innovate by treating time as a tunable parameter in a controlled cooking-chemistry system, iterating until you hit consistent yolk texture. Record ambient pressure, altitude, and water composition, then create a small matrix of trials; this empirical dataset lets you model outcomes and predict timings across conditions with quantified uncertainty margins.
The Best Way to Bring Water to a Gentle Simmer
Set the stove to medium heat to raise the water temperature gradually. You’ll see a gentle simmer when uniform tiny bubbles form on the pot bottom and rise slowly to the surface. Keep the heat at that level, adjusting in small increments to prevent a rolling boil.
Use Medium Heat
You use medium heat to raise cold water to a gentle simmer—about 85–92°C—so bubbles form steadily around the pot without vigorous rolling. You select medium heat because medium heat benefits precise timing and reduced mechanical stress on shells; it minimizes cracking and protein agitation. You monitor the burner and adjust to maintain steady energy input; heat control is the operational objective. Use a fitted lid briefly to conserve energy, then remove to prevent overshoot. Calibrate your stove: note dial settings that produce this range, log timings for repeatability. Implement incremental adjustments rather than binary high/low changes.
- Note stove-specific dial or induction setting.
- Use a digital thermometer for validation.
- Record repeatable timings for different batch sizes.
This approach yields consistent whites and yolks every time.
Look for Tiny Bubbles
After stabilizing medium heat, watch the water surface for tiny, evenly spaced bubbles forming along the pot bottom and sides—this pattern indicates a gentle simmer around 85–92°C. You’ll rely on this visual cue rather than thermometer drift; bubbles formation at the substrate shows dissolved gases leaving and microconvection currents establishing. Maintain that state to control egg white coagulation rate and yolk texture: avoid larger, rolling bubbles that elevate transfer of kinetic energy and risk cracking. Adjust flame or element in small increments; wait 30–60 seconds to confirm steady spacing and frequency. This method applies boiling science principles—phase change kinetics and heat flux—to reproducible culinary outcomes. Adopt it for iterative optimization and consistent, innovative results. You’ll log variables and refine timing across batches systematically weekly.
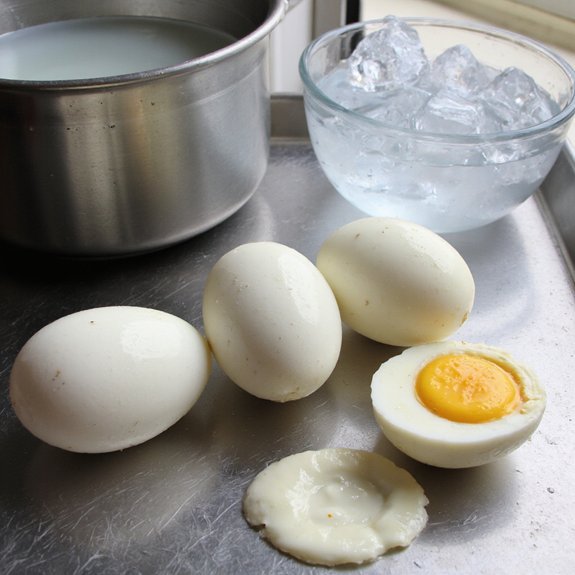
Shocking: Cooling Eggs Quickly for Perfect Texture
One effective technique shocks eggs in an ice bath to halt residual heat and lock the desired yolk firmness. You transfer eggs immediately from boiling water into a bowl of ice water to stop carryover cooking; this gives repeatable texture improvement by fixing protein coagulation rates. Aim for equal parts ice and water, guarantee full submersion, and chill for the required time based on egg size and doneness target. You’ll reduce core temperature quickly, minimizing grey rings and overcooking.
- Use measured ice water volume and thermometer feedback.
- Cool six to twelve minutes for hard, four to six for soft, adjust by elevation.
- Agitate gently to equalize cooling and prevent shell stress.
You’ll want precise timing, thermometer checks, and consistent coolant concentration. Iterate with small adjustments to yolk set and whites; the method scales for batch processing and culinary R&D. Document variables and log results for reproducible refinement improvement.
Foolproof Techniques for Easy Peeling
When aiming for predictable peeling, you’ll control egg age, cooking method, and post‑cook handling: use eggs 7–10 days old, cook by steaming or simmering (not a rolling boil) to minimize shell fracture, and raise the white’s pH with about 1 tsp baking soda per liter if using very fresh eggs. You’ll follow strict peeling techniques and minimal handling.
| Step | Parameter | Result |
|---|---|---|
| 1 | Egg age: 7–10d | Easier peel |
| 2 | Method: steam/simmer | Reduced cracks |
| 3 | Baker’s soda: 1 tsp/L | Higher pH |
| 4 | Immediate cool & tap | Membrane separation |
Use gentle tapping, roll under light pressure, and peel under running water. Manage egg storage for consistent results: rotate stock, label dates, and test batches to refine process. Adjust steaming time by altitude and egg size, document variables, iterate protocol, and incorporate small innovations to consistently improve peel reliability via daily testing.
How to Store and Reheat Cooked Eggs
If you plan to store cooked eggs, cool them in an ice bath and refrigerate within two hours at ≤4°C in a sealed container; unpeeled hard‑boiled eggs keep reliably for up to 7 days, peeled eggs and mixed egg dishes (egg salad, casseroles) for 3–4 days. Follow a concise protocol:
- Rapid cool: ice bath, shallow trays.
- Storage: sealed containers, date labels.
- Reheat: microwave with intervals, steam.
Use refrigeration tips: maintain 0–4°C, segregate from odorous foods, minimize headspace. For reheating methods, apply gentle thermal ramps — microwave with intervals for yolk mixes, steam peeled eggs covered to preserve moisture, or low oven (150°C) for casseroles. Consume reheated eggs immediately; don’t reheat twice. If you’re innovating, test texture and seasoning after chilling. Implement a HACCP mindset: control time, temperature, and cross-contamination to preserve safety and quality. You should log refrigerator temperatures daily and audit storage procedures for continuous improvement periodically too.
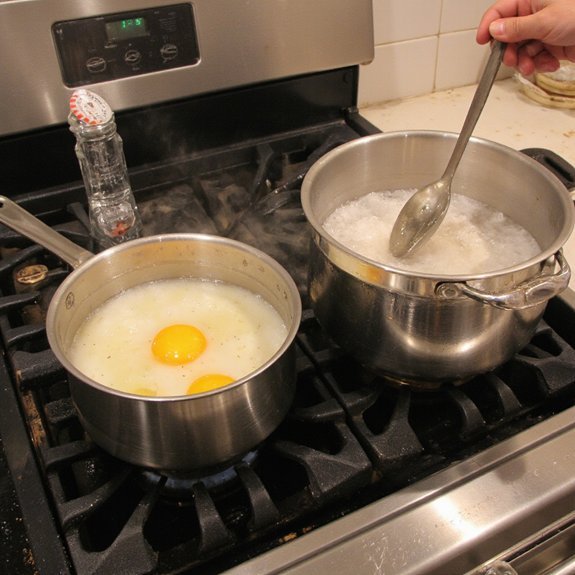
Troubleshooting Common Problems (Cracked Shells, Green Rings)
Because rapid heating, mechanical shock, and overcrowding raise internal pressure and stress the shell, eggs often crack during boiling; you’ll reduce cracking by starting eggs in cold water, using a gentle simmer (not a rolling boil), and spacing eggs to prevent collisions. If a shell cracks during cooking, contain leakage by lowering temperature immediately and transferring the egg to a separate shallow pan to finish at 80–85°C; that coagulates albumen around the breach and minimizes mass loss. To proactively avoid cracked shells, stabilize temperature ramp rate, pierce the blunt air cell with a 1 mm pin, and use a thermal buffer (cold water underlay). Green rings form from ferrous–sulfur compounds created when yolk iron reacts with hydrogen sulfide during prolonged heat exposure; prevent them by precise timing, immediate ice-bath quench, and slightly acidifying the cooking water with 1–2% white vinegar. Validate with small trials and controlled variables, repeat.
Creative Uses for Leftover Boiled Eggs
After you’ve avoided cracks and green rings with proper cooking and cooling, repurpose leftover boiled eggs across savory applications to maximize utility and reduce waste. You’ll prioritize texture control, flavor engineering, and efficient assembly.
- egg salad: emulsify yolks with mayo:acid 1:0.25, fine chop whites
- deviled eggs: blend yolks with mustard and oil for stable aeration, pipe
- sliced/diced: layer in salads, sandwiches, grain bowls; preserve moisture with light oil
You should store peeled eggs in airtight containers with a damp paper towel to maintain humidity and inhibit off-odors. Control residual heat to avoid overfirming yolks; adjust cooling duration to set desired yolk firmness and ease peeling. Calibrate seasoning: measure salt and acid for batch balance. Integrate chopped eggs into meal-prep modules to improve workflow and nutritional consistency. Clearly label dates and portions now. Implement a rotation system to reliably consume within one week, minimizing spoilage and maximizing culinary versatility.