

Start by inspecting the scratch under good light and cleaning the area; if your fingernail catches, it’s likely deeper than the clearcoat. You’ll want to know which products and steps will actually fix it versus make it worse, and when to stop and get professional help. Keep going—I’ll walk you through the simple tests, the DIY steps, and the limits of home repair.
Identify the Type and Severity of the Scratch
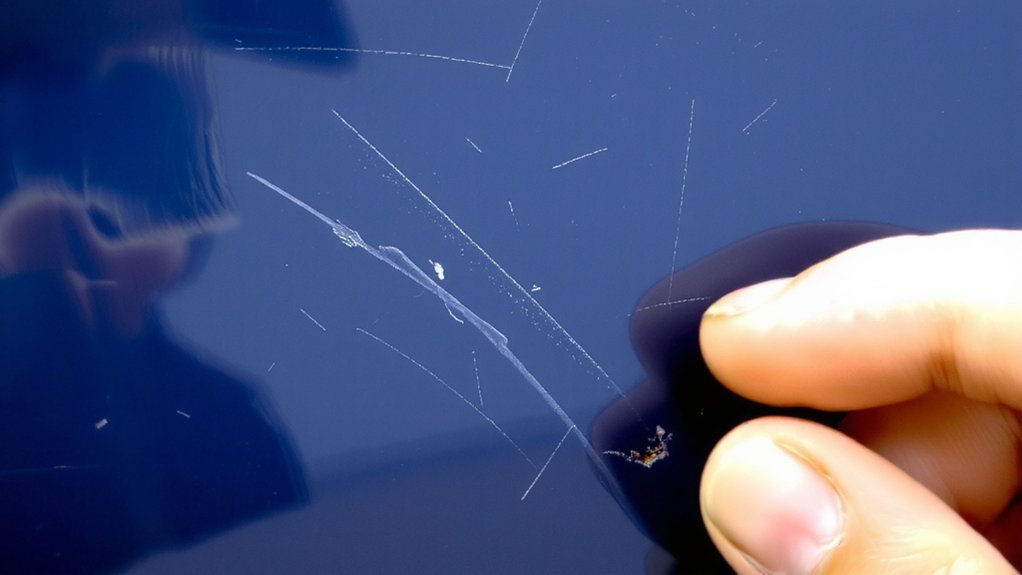
How deep is the mark—just in the clearcoat or into the paint and metal? You’ll first inspect the scratch under good light and at multiple angles, wiping the area clean so dirt won’t mislead you.
Run your fingernail lightly across the groove: if it catches, the damage likely reaches the basecoat or metal; if it glides, it’s probably only clearcoat.
Note whether paint is missing, primer shows, or rust has started —those change repair options.
Map its length, width and position on the panel, and check nearby edges, seams and trim for hidden stress.
Also compare against the vehicle’s finish —matte, metallic or pearlescent —since appearance affects outcomes.
Record what you find before proceeding. That assessment tells you whether DIY fixes will be suitable.
Gather Tools and Products You’ll Need
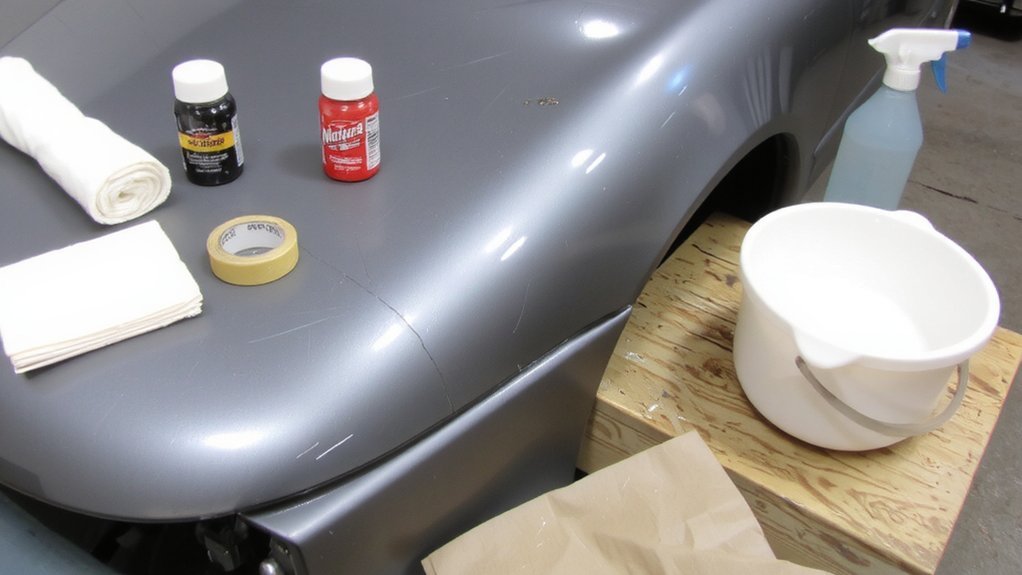
Since you’ve assessed the scratch, gather the right tools and products that match its depth and finish—cleaning supplies (car soap, microfiber towels, clay bar), abrasives (sanding blocks/papers in varying grits), compounds and polishes, touch-up paint/primer/clearcoat or a paint pen for deeper damage, masking tape and applicators, and a dual-action polisher or pads if you’ll be buffing.
Choose sandpaper grit from 2000 to 3000 for light clearcoat blemishes and 800 to 1500 for deeper primer-level sanding. Pick a rubbing compound for heavier defects and a finishing polish for gloss restoration. Match touch-up paint to your vehicle’s color code. Select foam and microfiber polishing pads sized for your polisher. Use small brushes, toothpicks, and plastic spreaders for precise application.
Always.
Prepare the Area: Cleaning and Masking
Preparing the area means cleaning the surface thoroughly and masking surrounding panels to protect paint and trim.
You’ll first wash the damaged section with automotive soap and water, removing dirt, grease, and wax residue.
Dry with a clean microfiber towel so you don’t introduce new scratches.
Use isopropyl alcohol or panel prep solution on a lint-free cloth to remove oils where you’ll work.
Inspect under good light to ensure the area is spotless.
Apply painter’s tape and plastic or paper sheeting to adjacent panels, chrome, and rubber seals so compounds and polishes don’t contact them.
Mask edges precisely to keep lines clean.
Remove any loose debris from crevices with a soft brush.
Now you’re ready to proceed safely.
Take your time and stay organized.
Manual Scratch Removal: Step-by-Step Technique

Before you start, check the scratch depth and assemble the tools you’ll need: microfiber towels, isopropyl alcohol or panel prep, rubbing compound, a finishing polish, foam or suede applicators, a soft polishing pad, and 2000–3000 grit sandpaper for deeper clear-coat scratches.
Clean the area thoroughly and dry it.
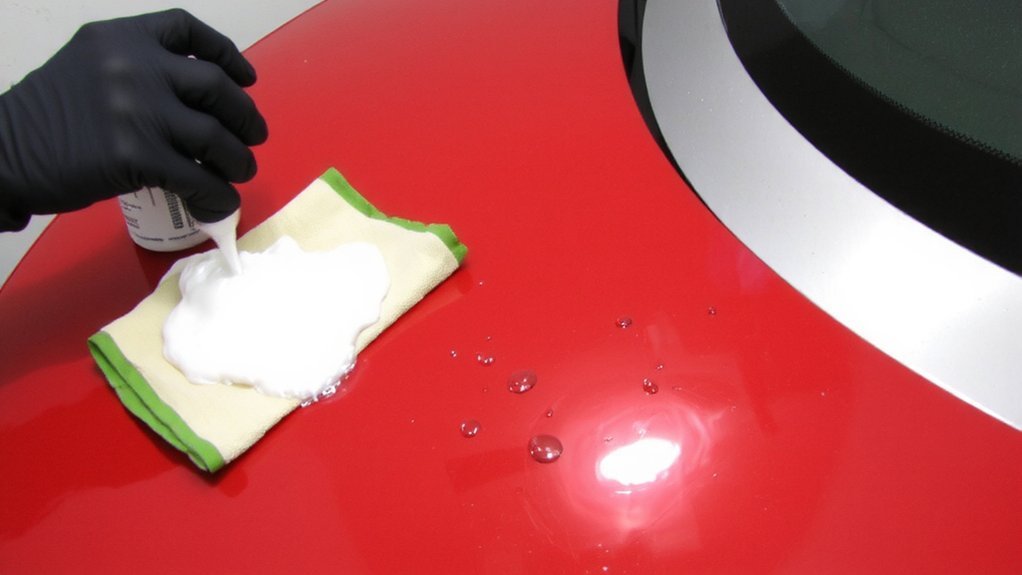
For surface scratches, apply a small amount of rubbing compound to an applicator and rub with light, even pressure in overlapping circular motions until the mark fades.
For clear-coat scratches that catch your fingernail lightly, wet-sand carefully with 2000–3000 grit, keeping the area lubricated, then compound to restore gloss.
Wipe residue with isopropyl, inspect under good light, and follow with finishing polish.
Seal the repaired area with wax or paint sealant and allow curing time overnight.
Using Drill Attachments and Orbital Polishers

Using drill attachments for polishing can work, but you’ll get better, safer results with a low-speed orbital polisher—especially on clear coat.
You can use drill-mounted foam pads for small jobs, but drills create heat and high RPMs that can burn clear coat or create swirl marks.
An orbital polisher oscillates and reduces risk, letting you remove light scratches with polish or light compound.
Use soft foam or microfiber pads, keep speeds low, and apply light, even pressure.
Work a small test spot, wipe residue, and inspect before proceeding.
Keep the pad clean, change pads when saturated, and avoid aggressive compounds on thin paint.
Finish with a fine polish and sealant to protect the repaired area.
Always work in shade, wearing gloves, goggles, respirator too.
Choosing the Right Product for Different Scratch Types
If you used an orbital polisher to remove light marks, you’ll next need products that match the scratch depth rather than reach for a one-size-fits-all solution.
Assess: if scrape only affects clear coat, use a mild polish or scratch remover and microfiber pads.
For deeper scratches into base coat, get a fine rubbing compound, polish, and color-matched touch-up paint.
Bare metal requires primer, paint, and clear coat.
Choose sandpaper grit progressively—2000–3000 for blending, coarser only for leveling metal—with water.
Match touch-up paint using your vehicle’s paint code and apply thin layers.
Always clean the area with isopropyl alcohol before starting and test products on an inconspicuous spot.
Finish with a sealant or wax to protect repairs.
Work slowly, check progress, and adjust pressure often.
When Professional Repair Is Necessary
When scratches cut through to bare metal, expose rust, cover a large area, or affect sensors and trim, you should consult a professional—these issues need body-shop tools, paint-matching equipment, and experience to restore corrosion protection and structural integrity.
Don’t try DIY when panel alignment, underlying dents, or electronic components are involved; improper repair can worsen damage and void warranties.
A certified technician will assess filler needs, corrosion treatment, and correct primer and paint layers.
They’ll match color, blend adjacent panels, and test sensors or parking-assist systems.
Get written estimates, check certifications and customer reviews, and ask about warranty on work and paint.
If safety, resale value, or long-term protection matters, leave it to the pros. Expect timelines and costs to depend on damage severity.
Aftercare: Polishing, Waxing, and Preventing Future Scratches
Polishing your repaired area restores gloss and removes light marring, and following that with a quality wax or paint sealant will lock in protection and make future scratches less likely.
After polishing, use a microfiber pad and moderate pressure; work in small sections and remove residue with a clean cloth.
Choose a durable synthetic sealant or natural carnauba wax depending on desired shine and longevity—sealants last longer, wax gives deeper gloss.
You’ll reapply every three months for sealant or every six to eight weeks for wax if you park outdoors.
Park thoughtfully, avoid tight spots, and use a soft cover when possible.
Regular washing with a grit-free mitt and detailing spray reduces abrasive contaminants that cause scratches.
Inspect monthly and touch up as needed.
Conclusion
Now you know how to assess scratches, gather supplies, and prep the area. If a fingernail catches, you’ll need paint and primer; if it just skims, you can work the clearcoat with compound, wet‑sand if deeper, then polish and seal. Use color‑matched touch‑up for exposed primer or metal, and call a pro for rust, large panels or blending. Finish with polish and wax, and keep up simple care to prevent more damage and inspect regularly.