You’ll start by identifying whether the paper peels off or is glued down, then gather a scorer, sprayer, scraper, and a remover or steamer. You’ll protect floors and test a small patch, then score, soak, and strip in controlled sections to avoid damage. Follow the next steps to handle stubborn glue and finish the wall properly.
Key Takeaways
- Identify wallpaper type (peelable, strippable, vinyl) and test a small hidden patch to choose the right removal method.
- Clear the room, remove plates, protect floors and trim with drop cloths and painter’s tape before starting.
- Score stubborn wallpaper only when necessary, then apply wallpaper remover or steam and allow adequate dwell time.
- Peel or scrape gently with a wide putty knife, then clean residual paste with a low-odor detergent or adhesive remover.
- Inspect walls for damage, repair holes or soft spots, skim-coat if needed, and prime before repainting or rewallcovering.
Tools and Supplies You’ll Need
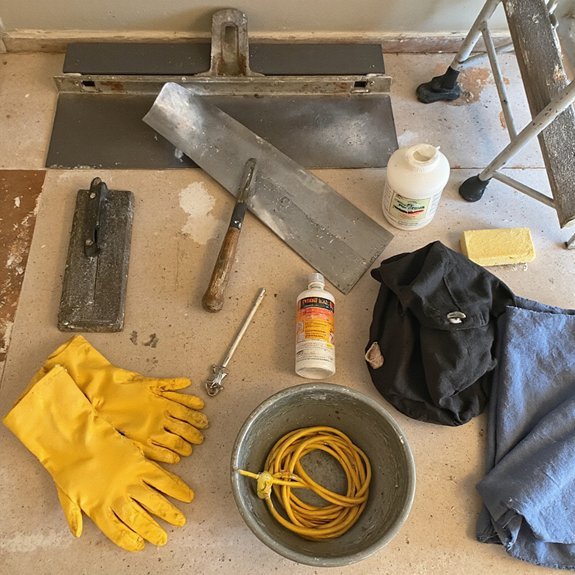
Before you begin, gather the right tools and supplies so the job goes smoothly: a scoring tool, a wide putty knife or wallpaper scraper, a spray bottle or pump sprayer, wallpaper remover solution or a mixture of warm water and fabric softener, drop cloths, utility knife, scrub sponge, bucket, gloves, safety goggles, and a ladder or step stool. You’ll set up drop cloths, position the ladder, and wear goggles and gloves before you score and wet seams. Choose a remover solution that matches your removal techniques plan; test a small area to confirm effectiveness. Use the scoring tool to create channels, then apply solution with the sprayer and wait the specified dwell time. Work methodically from top to bottom with the putty knife to lift paper without gouging drywall. Maintain consistent pressure and replace blades as needed. You’ll finish faster by organizing tools and following safe, repeatable steps.
Identifying the Type of Wallpaper
Before you begin, you should determine whether the top layer is peelable (lifts off in sheets) or strippable (needs wetting to remove). You can check material: paper is thin and tears easily, vinyl feels plastic and repels water, and nonwoven is fabric‑like and generally strips intact. Test a small hidden patch to confirm the type and decide if you’ll need scoring, solvent, or steam.
Peelable Vs Strippable
Peelable and strippable wallpapers look similar at a glance, but they remove differently: peelable wallpaper has a paper or vinyl face you can lift off the wall like sticker, while strippable (often “pre-pasted” or heavy-duty vinyl) loosens with water and requires you to strip the backing once paste softens. You’ll choose peelable when you want minimal prep; peelable wallpaper advantages include reduced wall damage risk and quicker turnaround. Opt for strippable when layers are stubborn or adhesive is stronger; strippable wallpaper benefits are removal and compatibility with renovation-grade adhesives. To test, score a small seam and try lifting an edge; if it peels clean, proceed. If it resists, dampen and wait, then strip. Work methodically, use the right tools, protect finishes, save time.
Paper, Vinyl, Nonwoven
Start by examining a hidden seam or cut-out: paper wallpapers feel thin and tear or bruise easily, vinyl has a smooth, slightly plastic surface and a distinct backing, and nonwoven feels fabric-like with a polyester/cellulose blend that resists stretching. Once identified, choose method: for traditional paper, use scoring lightly, apply controlled moisture, then employ tested paper removal techniques to lift layers without damaging plaster. For vinyl, recognize vinyl wallpaper advantages: durable, washable, often requires surface stripping or edge cutting before solvent or steaming because top layer resists moisture. For nonwoven, you’ll usually peel from the substrate dry or apply minimal solution—the engineered backing releases cleanly. Match tools and solvents to material to optimize speed and preserve substrates. You’ll save time and prevent costly repairs.
Preparing the Room and Protecting Surfaces
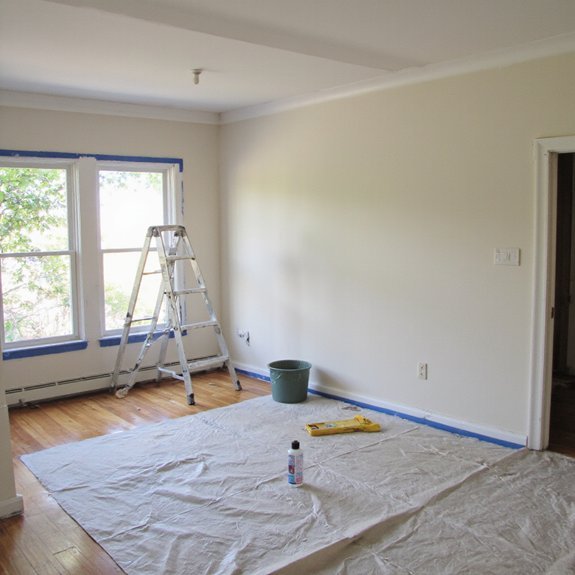
Three actions will make the job safer and faster: you’ll clear the room of furniture and wall hangings, remove outlet and switch plates, and protect floors and trim with durable drop cloths and painter’s tape. Plan your room layout to give 3–4 feet work zones; keep pathways clear. Use drop cloths and painter’s tape for surface protection; overlap cloths and tape trim. Remove outlet and switch plates; cap powered devices for safety. Protect furniture you can’t remove with plastic sheeting and straps.
| Item | Emotion |
|---|---|
| Empty room | Relief |
| Covered floor | Confidence |
| Labeled plates | Control |
| Sealed trim | Calm |
Set up lighting and ventilation; use LED work lights and box fan. Keep tools on a rolling cart so you won’t track debris. Wear gloves, eye protection, and a respirator if adhesive dust’s present. These steps reduce mistakes, speed workflow, and let you focus on removal with an innovative, predictable, efficient workspace.
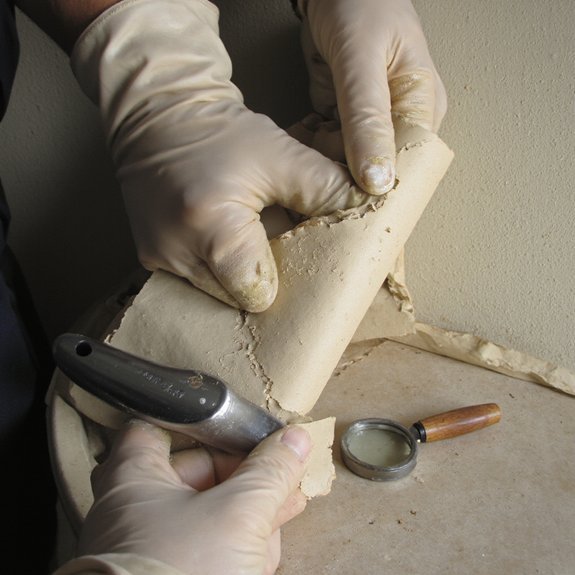
Scoring and Soaking: Manual Removal Methods
Before you score, inspect the wallpaper seams and trim so you know where to avoid damaging drywall, then use a carbide-scoring tool to puncture the paper in a regular 1–2 inch grid—small, shallow holes let your soaking solution penetrate the adhesive without gouging the wall. You’ll work in 3–4 foot sections, scoring only the paper layer and avoiding pressure on plaster or joints. Adopt consistent scoring techniques: controlled, light passes with the tool, maintaining blade angle and spacing to prevent over-penetration. Mix a soaking solution (warm water with surfactant or diluted wallpaper remover) and apply evenly with a pump sprayer or sponge. Allow dwell time, then test a corner with a putty knife. Use a flexible scraper at a shallow angle to lift softened paper; reapply solution where resistance persists. Clean residual paste with a microfiber pad and inspect drywall. These soaking methods reduce sanding and enable repair.
Using a Steamer or Chemical Strippers Safely
You should choose a steamer rated for wallpaper removal with adjustable steam output and a large water tank, or pick a chemical stripper formulated for your wall substrate. You must wear proper PPE—gloves, eye protection, and a respirator or vapor-rated mask—when operating steamers or applying solvents. You should follow label instructions and local regulations for neutralizing and disposing of spent chemicals and contaminated rags to prevent fumes and environmental harm.
Pick the Right Steamer
When selecting a wallpaper steamer, match the unit’s output and features to the job: pick a 1,500–1,800 W model (or higher for large areas) with a 1–2 L tank for 30–60 minutes of continuous steam, a quick heat-up time, a long insulated hose and interchangeable heads for corners and textured surfaces, and built-in safety features like auto shutoff and overheat protection. Next, assess steam types—low-pressure for delicate substrates, high-pressure for vinyl and heavy paste—and choose a steamer that lets you adjust output. Compare steamer brands for reliability, service and accessories. Opt for modular designs with replaceable hoses and heads so you can upgrade. You’ll work faster with a unit that balances power, tank capacity and mobility; test heat-up and hose ergonomics before buying now.
Personal Protective Gear
Because steam and chemical strippers pose different hazards, pick personal protective equipment that matches the specific risk and the product Safety Data Sheet (SDS). You’ll want a plan that puts safety first: respiratory protection for solvents (NIOSH-rated cartridges or P100), eye protection (splash-rated goggles), and chemical-resistant gloves (nitrile or neoprene per SDS). For steam, use heat-resistant gloves, long sleeves, and a face shield to guard against burns and scalds. Ventilation is essential—use local extraction or fans and don’t rely on corseted HVAC. Wear low-profile disposable coveralls to protect clothing and reduce contamination spread. Inspect gear before use, replace damaged items, and train anyone helping on donning, doffing, and emergency response. Keep labels and SDS accessible throughout the job. Document exposures and review controls regularly.
Safe Chemical Disposal
One essential step is treating spent stripper solutions, slurry and steamer condensate as potentially hazardous and keeping them separate from regular trash or drains. You’ll collect liquids in labeled, sealable containers and store them in a ventilated, secondary‑containment tray. Check product labels and SDS to classify contents; if they’re listed as hazardous waste, follow local authority guidance for pickup or drop‑off. Don’t dilute and pour down the sink. Explore certified chemical recycling services for solvents or emulsions that can be reclaimed—this reduces disposal cost and environmental impact. For small projects, mix solids into solidifiers that meet municipal acceptance criteria. Document chain of custody and receipts to demonstrate compliance. You’ll protect people and assets.
Removing Residue and Cleaning the Wall Surface
Several types of residue—starch or methylcellulose paste, torn paper fibers, and adhesive backing—often cling to plaster or drywall, and you’ll need to remove them to provide a clean, sound substrate. For wall prep, select low-odor cleaning solutions: diluted trisodium phosphate (TSP alternative), mild detergent, or a commercial adhesive remover rated for drywall. Test a small area, then work systematically top-to-bottom. Use a plastic scraper, natural-bristle brush, and a microfiber pad to avoid surface gouging.
Apply solution, let dwell 5–10 minutes, then agitate gently; repeat on stubborn patches. Rinse thoroughly with clear water; blot with lint-free towels to minimize water absorption. For textured or plastered surfaces, use a soft nylon brush and minimal moisture to preserve texture. Finally, allow the wall to dry fully, then inspect under oblique light for remaining residue. If any adhesive remains, reapply targeted solvent and repeat cleaning until the surface is uniformly residue-free again.
Repairing and Prepping Walls for Paint or New Covering
Start by inspecting the cleaned wall for loose material, soft spots, nail pops, cracks, holes, and any areas of delamination; cut out and replace sections of drywall that are water-damaged or crumbling. Next, assess wall condition systematically: tap for hollows, measure moisture, and mark defects. Remove protruding fasteners and drive or replace screws to set drywall flush. For minor holes and cracks, apply a bonding primer, then use a setting compound to fill and feather repairs; sand only when dry to avoid gouging. Use a skim coat to unify surface texture where seams or adhesive scars remain; a thin, consistent layer reduces sanding and improves adhesion. Prime repaired areas with a high-adhesion primer tailored to your finish—use stain-blocking primers for residual tannins. Finally, inspect under directional light, touch for uniformity, and address any remaining irregularities before painting or installing new covering to guarantee durable, innovative results and longevity.