Grout traps dirt and mildew because it’s porous, so you’ll need methods that penetrate and lift soils without abrasion. You can use heat, oxidizers, enzymes, or sealants to dissolve or prevent buildup. Each approach has trade-offs for tile type and finish. Keep going to identify the safest, most effective option for your situation.
Key Takeaways
- Use high‑temperature steam (200–300°F) with a narrow nozzle to loosen and liquefy grime, then blot or vacuum away residue.
- Apply an enzyme or microbial cleaner, allow the recommended dwell time to digest soils, then rinse without scrubbing.
- Pour an oxygen‑bleach solution (sodium percarbonate or hydrogen peroxide), let sit 10–30 minutes, then rinse thoroughly.
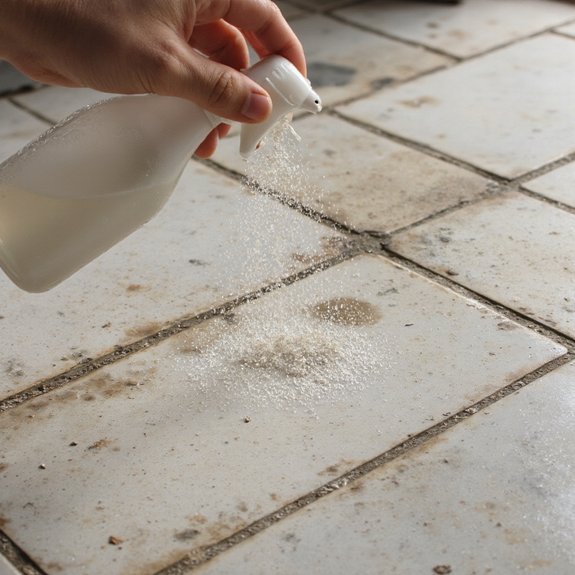
- Apply a poultice or paste (baking soda + hydrogen peroxide), cover to draw stains out, then lift and rinse after dwelling.
- After cleaning, apply a low‑VOC grout sealer to reduce future staining and minimize the need for scrubbing.
Why Grout Attracts Dirt and Mildew
Because grout is porous and textured, it soaks up water, oils and soil where tiles meet, creating a persistent reservoir for contaminants. You need to understand grout composition to address why it attracts dirt and mildew: cementitious matrices, polymers, and additives set a capillary network that holds moisture and nutrients for microbial growth. Surface roughness increases contact area, so dirt accumulation happens along joints rather than smooth tile faces. You’ll see that pH sensitivity and ionic exchange influence how soils bind; alkaline cleaners modify surface charge but won’t change porosity. Thermal cycling and mechanical abrasion open microfissures that accelerate uptake. For innovative, hands-off solutions you’ll evaluate sealants, hydrophobic treatments, and engineered coatings that alter wettability and block capillaries without sanding or scrubbing. Assess compatibility with substrate, expected wear, and maintenance cycles to select a scalable, low-effort intervention that minimizes recurring contamination. Document performance metrics and adjust treatment intervals.
Steam Cleaning: Hands-Free Grout Refresh
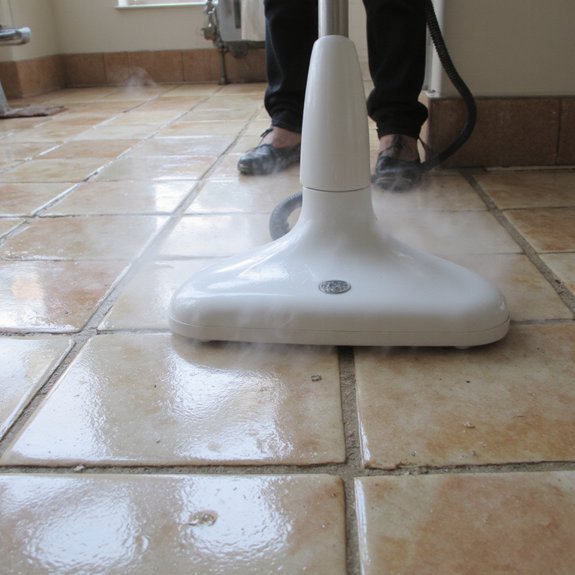
You use high-temperature steam to liquefy and lift soils and biological growth from grout pores without abrasives. Effective units produce 200–300°F (93–149°C) steam at pressure while minimizing wetting to protect tile and substrate. For safety, you’ll wear heat-resistant gloves, keep the nozzle moving to avoid surface burns, and follow the manufacturer’s ventilation and electrical instructions.
How Steam Works
When high-temperature steam contacts grout, it transfers thermal energy that loosens soil and dissolves biofilms while the accompanying water vapor and pressure displace softened residue from pores and joints. You harness steam efficiency by controlling nozzle size, pressure and dwell time to maximize heat penetration into porous grout without chemicals. The process converts latent heat to mechanical displacement: microjets and vapor expand in pores, breaking bonds and emulsifying organics. You target contact angle and movement patterns to extract residue into a recovery channel or absorbent. Monitor temperature and flow metrics to validate performance. The following table summarizes key variables, expected effect and measurement method.
| Variable | Effect | Measurement |
|---|---|---|
| Nozzle size | Increased jet velocity | mm/orifice |
| Pressure | Higher penetration | psi/bar |
| Dwell time | Greater heat transfer | seconds |
optimized.
Steam Safety Tips
If you’re operating a steam cleaner for grout refresh, follow strict safety controls to prevent thermal injury, inhalation exposure, and equipment failures. You should verify manufacturer ratings, inspect hoses and seals for degradation, and guarantee all pressure relief valves function before use. Monitor steam pressure continuously; set limits below material and fixture tolerances and never bypass interlocks. Use certified PPE: heat-resistant gloves, eye protection, and an N95 or respirator when debris or chemical residues are present. Maintain ventilation to dilute aerosols and avoid confined-space operation without testing for vapors. Position the unit on a stable, nonconductive surface and route cords to prevent trip hazards. After use, cool the system, depressurize per procedures, and store dry. These safety precautions extend equipment life and protect health.
Enzyme and Microbial Grout Cleaners
One effective option is enzyme- and microbe-based grout cleaners, which use targeted enzymes or live microorganisms to digest organic soils, biofilms, oils, and proteinaceous stains so you don’t have to scrub. You apply a controlled formulation, let it dwell, and microbes metabolize residues into soluble byproducts you rinse away. Focus on enzyme effectiveness metrics: specific activity (U/mL), substrate range, pH and temperature optima, and contact time. Review product datasheets for microbial strains, viability, and safety classifications to verify regulatory compliance. You’ll gain microbial benefits such as self-replenishing activity on residual organics and reduced corrosivity compared with caustics. For best results, pre-wet grout to improve diffusion, avoid disinfectants that inactivate biological agents, and maintain manufacturer-recommended dwell times. Use in well-ventilated spaces and follow disposal guidance for biomass. For innovation-minded users, consider enzymatic blends targeted to common grout contaminants and test in an inconspicuous area to validate efficacy before application.
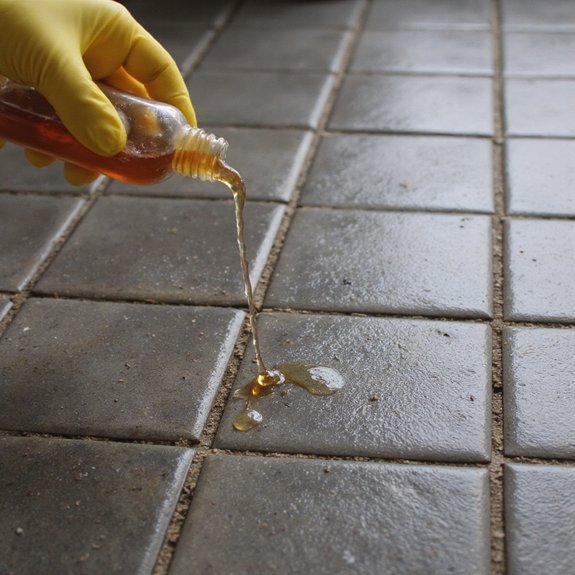
Oxygen Bleach and Non-Chlorine Methods
Because oxygen-based bleaches (sodium percarbonate, hydrogen peroxide) release reactive oxygen species that oxidize organic chromophores instead of forming chlorinated byproducts, you can use them to lift soils and lighten grout stains with substantially lower material attack and odor than chlorine bleach. You’ll apply a measured paste or soak: mix sodium percarbonate powder with warm water to activate oxygen release, or use 3–6% hydrogen peroxide solutions for targeted application. Let dwell 10–30 minutes; agitation is optional if you want no scrubbing. Rinse thoroughly to remove residual peroxide and dissolved organics. The oxygen bleach benefits include broad-spectrum oxidation, reduced volatilization, and compatibility with many tile substrates; test inconspicuous areas for colorfastness. For persistent biological soils, combine enzymatic pretreatment then apply oxygen chemistry. Consider non chlorine alternatives like percarbonate-based formulations for indoor use where chlorinated byproducts, odor, or material degradation are unacceptable. Store dry; follow manufacturer safety data sheets for longevity.
Magic Erasers and Microfiber Tools
Magic Erasers use melamine foam to abrade and lift soils at a micro level, so you’ll wet the pad and apply controlled passes rather than scrubbing hard. Use microfiber brushes and cloths dampened with water or a mild cleaner—choose a small, angled brush to work along grout joints and let the fibers lift particles into the nap. Test a hidden area first, use light pressure, rinse frequently, and avoid aggressive tools or chemicals on sealed or deteriorating grout.
How Magic Erasers Work
Anyone who’s used a melamine-foam “Magic Eraser” will notice it removes scuffs through mechanical action rather than chemistry. You press porous melamine microstructure onto grout, and its abrasive microfilaments shear and lift embedded soil; water softens debris and flushes particles. For grout renewal, you control pressure, dwell time, and pad replacement to maximize magic eraser effectiveness without abrading tile. Use short strokes, change pads when clogged, and rinse residue to prevent redeposition. These cleaning techniques are compatible with sealants if you test an inconspicuous area first. You won’t rely on solvents, so material compatibility and operator technique determine outcomes. Adopt measured experiments: vary pressure and time, document results, and refine parameters for repeatable, low-effort grout restoration. Record settings and maintenance intervals for consistent performance.
Using Microfiber Brushes
When you pair melamine foam pads with microfiber brushes, you get complementary abrasion and particle capture that speeds grout cleaning with minimal scrubbing. You’ll use the foam for micro-abrasion to dislodge carbonized soils while microfiber brushes trap and extract residues from pores. Select dense, low-pile microfiber with polymer-infused backing to maximize microfiber effectiveness and channel fluids into the brush core; use firm angled bristles to guide particles into the pad. Work in short passes, rinse the brush frequently, and replace foam pads when glazing occurs. This system reduces dwell on caustics, simplifies grout maintenance scheduling, and cuts labor time. For innovators, integrate calibrated pressure, exchangeable heads, and measurable cleaning cycles to quantify performance gains. You’ll record metrics to validate efficiency and iterate tool configurations.
Tips for Gentle Cleaning
Start by testing a small, inconspicuous area and use only damp—not soaking—melamine foam and microfiber to avoid over-wetting grout or removing sealant. When using a Magic Eraser, apply light linear strokes; the melamine structure abrades stains without chemical agents, so you’ll limit pressure and dwell time to preserve grout profile. Pair with microfiber pads to lift particulates: choose high-density, low-lint fibers and wring to a consistent dampness. For routine maintenance, deploy gentle cleaners formulated for grout or vetted natural solutions like diluted vinegar or baking soda paste at controlled concentrations; neutralize acidic agents afterward. Rinse with clean, damp microfiber and dry promptly to prevent capillary uptake. Document results and iterate technique, adjusting pad density and cleaner ratio for best, noninvasive performance and longevity safely.
DIY Paste Options That Dissolve Grime
If grout is heavily soiled, you’ll achieve faster breakdown of grime by using thick, chemically active pastes that adhere to vertical joints: baking soda combined with hydrogen peroxide yields an alkaline, oxygen-releasing paste that lifts organic stains and softens soap scum; a borax paste provides stronger alkalinity and sustained stain-lifting on ceramic and porcelain (not recommended for soft stone); citric acid or a diluted vinegar gel dissolves mineral deposits but risks etching on calcareous tiles; and enzyme-based commercial pastes target proteinaceous residues without harsh pH. Prepare a baking soda paste by mixing powder with peroxide to mayonnaise consistency, apply with a spatula, and cover to maintain contact time. For mineral scale, make a vinegar solution gel with xanthan gum; test an inconspicuous area. Use borax sparingly, wear gloves, eye protection, and ventilate periodically. Follow contact-time recommendations on enzyme products. Rinse thoroughly and neutralize alkaline residues to prevent re-soiling.
Using a Grout Pen and Color Sealers
A grout pen lets you quickly recolor and hide surface stains while a color sealer restores uniform pigment and adds water- and stain-resistance; you’ll want to use the pen for small touch-ups and the sealer for full-joint renewal or long-term protection. When you select grout pens, choose pigment-matched, fast-drying formulations with solvent bases that bond to ceramic and stone; test on an inconspicuous strip to verify adhesion and color. Apply steady pressure, move the pen along grout lines, and wipe excess immediately with a lint-free cloth to avoid residue on tile. For color sealing, pick a penetrating, low-VOC sealer rated for grout; apply with a narrow applicator or brush, maintain a wet edge, and remove surplus within manufacturer’s open time. Allow full cure per technical data sheet before exposing to water. Combined, grout pens and color sealing deliver cosmetic correction and hydrophobic performance, reducing staining risk without abrasion.
Preventive Sealing and Maintenance Hacks
When you want to keep grout protected and minimize future scrubbing, apply a penetrating, low‑VOC grout sealer to clean, fully dry joints and follow the manufacturer’s prep, wet‑edge and cure specifications precisely. You’ll integrate sealing grout into a predictable preventive maintenance routine that reduces moisture ingress, staining and biofilm. Use measurable intervals and test patches to validate performance before full-area application. Inspect and reapply based on porosity readings or visual water-beading failure.
- Schedule inspections every 6–12 months and log conditions.
- Clean with pH-neutral solutions before resealing.
- Use a micro-fiber applicator for even penetration.
- Maintain ventilation during cure to control VOCs.
- Keep product lot and cure-time records for QA.
This approach makes preventive maintenance data-driven, repeatable and compatible with advanced surface coatings and smart-monitoring workflows. You can integrate sensor-based moisture alarms, digital logs and scheduled NFC tags to optimize intervals, reduce manual checks and extend seal lifespan by design.
How to Clean Grout in Hard-To-Reach Spots
Because dirt and biofilm accumulate in recessed joints and corners, you’ll need targeted tools and methods to access and treat those areas without harming adjacent tiles. Use narrow applicators—disposable interdental brushes, syringe-nozzle bottles, and foam swabs—to deliver concentrated enzymatic or pH-neutral cleaners directly into hard-to-reach grout lines. Apply cleaner, let dwell per manufacturer instructions, then agitate gently with a stiff nylon micro-brush to dislodge residue without abrading tile surfaces. For vertical or overhead seams, use an angled extension on a bottle or bent-tip nozzle to control flow and prevent runoff. For persistent staining, inject a low-pressure ozone or steam pulse in bursts to lift organic deposits; follow equipment specs to avoid grout softening. Rinse with minimal distilled water using a suction wet vacuum or absorbent microfiber rope to extract loosened material. Record effective grout cleaning techniques; adjust dwell time, tool geometry, and chemical concentration to optimize each substrate.
Safe Practices and When to Call a Pro
If you’re tackling grout cleaning yourself, prioritize safety controls and clear stop-points so you don’t escalate damage or risk injury. You’ll use PPE, test proprietary solutions on inconspicuous areas, and avoid mixing chemicals; that discipline preserves substrate integrity and protects you. Use measured contact time and neutralizers, and document results to refine cleaning frequency as part of predictive grout maintenance.
- Wear gloves, eye protection, and a respirator when using volatile cleaners.
- Test cleaners on a 2×2-inch area for 24 hours.
- Use dilution ratios supplied by manufacturers; don’t improvise.
- Stop and consult a supplier if grout softens, puffs, or discolors.
- Schedule inspections tied to cleaning frequency metrics.
Call a professional when substrate damage, mold behind tiles, or complex sealant failures appear; they’ll use diagnostics and remediation tools you shouldn’t attempt alone. You’ll have better outcomes and lower lifecycle costs when you act within these safety parameters and timelines consistently.