You want a juicy chicken breast every time, and you’ll get there without tricks. Brine briefly or use a quick marinade, cook at moderate heat and pull at the right internal temperature, then rest. Simple technique, predictable results. Next, get the tools and timing right.
Key Takeaways
- Brine or salt the breasts (5% quick brine for 30–90 minutes) to season and retain moisture before cooking.
- Use a probe thermometer and remove at 155–160°F to allow carryover cooking to reach safe 165°F without drying.
- Choose gentle methods (sous-vide, low-temperature poach) for even, moist results when precision matters.
- Sear briefly in a hot pan with high-smoke-point oil to create a crust without overcooking the interior.
- Rest breasts 5–10 minutes before slicing to redistribute juices and slice with a sharp knife against the grain.
Why Chicken Breast Dries Out and How to Prevent It
Because chicken breast is lean and cooks quickly, it dries out the moment you overshoot its safe internal temperature; to prevent that, treat it deliberately: brine or salt it ahead for moisture and seasoning, pound or butterfly to an even thickness, sear or roast at moderate temperatures, use a probe thermometer and pull the meat at about 155–160°F (it’ll rise to 165°F while resting), and finish with a small pat of butter or a quick sauce. You’ll also choose chicken cuts and portions that suit your technique: thin cutlets for fast sears, thicker breasts for gentle roasting or sous‑vide. Manage carryover heat, rest time, and minimal slicing to preserve juices. For moisture retention, control surface temperature, avoid overcrowding, and apply fat or sauce after resting. Innovate with rubs, compound butters, or brief marinades to layer flavor without overcooking. Experiment with tech-forward tools to repeat your best results consistently.
The Benefits and Basics of Brining

If you want reliably juicier, better‑seasoned chicken breast, start with brining: it locks moisture in and seasons the meat more evenly than surface salting alone. Brining solutions are simple: water, salt, and optional sugar or aromatics. You’ll control texture by salt concentration and time — too strong or too long makes meat spongy. Use a scale: for quick brine, dissolve 5% salt by weight (50g per liter) and brine 30–60 minutes for halves; for full breasts, 60–90 minutes. Rinse briefly and pat dry before cooking.
- Experiment with concentration to balance moisture and texture.
- Keep temperatures cold; brine in the fridge for safety and predictability.
- Use measured timings; set a timer to avoid over-brining.
- Combine brine with vacuum or resealable bag for efficient contact.
Brining gives consistent Flavor enhancement and predictable results, so you’ll innovate confidently without guessing. Trust the method. Repeat often. Refine routinely.
Marinades, Flavors, and Timing
You can transform chicken breasts in minutes with quick marinades—olive oil, lemon and garlic for bright, classic flavor, or soy, honey and ginger for a savory-sweet punch. You’ll use lighter 15–30 minute marinades for delicate citrus or herb blends and 2–4 hours for bolder soy or vinegar-based mixes, avoiding overnight acidic soaks that can make meat mealy. Cook breasts to an internal 165°F (74°C): about 6–8 minutes per side on the stove, or 20–25 minutes at 400°F in the oven for average 6–8 oz pieces, then rest 5 minutes before slicing.
Quick Marinade Ideas
Marinades concentrate flavor and tenderize chicken breast quickly when they balance acid, fat, and seasoning. You’ll choose bold combinations that penetrate without masking texture, and you’ll marinate briefly for punch. Use these quick mixes to innovate weeknight cooking and preserve juiciness.
- Garlic herb: olive oil, crushed garlic, lemon zest, thyme, salt — toss and marinate 20–40 minutes.
- Citrus soy: orange juice, soy, rice vinegar, sesame oil, ginger — bright, umami-rich, and fast.
- Yogurt curry: plain yogurt, turmeric, cumin, garlic, lime — enzymes soften and add spice.
- Honey mustard: Dijon, honey, apple cider vinegar, olive oil, cracked pepper — sweet-tang contrast.
Rotate them, tweak acid and fat ratios, and trust brief soaks to transform plain breast into innovative, reliably moist meals you’ll serve with confidence.
Perfect Cook Times
How long should you cook a marinated chicken breast to get peak flavor and juiciness? Aim for internal 145–150°F (63–66°C) and let rest 5–10 minutes; carryover heat finishes cooking while preserving moisture. For pan-searing, sear 3–4 minutes per side over medium-high, then finish in a 350°F oven 6–8 minutes depending on thickness. For grilling, 6–8 minutes total over direct medium heat, flipping once. For sous-vide, set 140–145°F and sous-vide 1–2 hours for tender, forgiving results. These cooking methods demand you adjust for timing variations based on thickness, marinade sugar content, and starting temperature. Use an instant-read thermometer; prioritize precise temps over guesswork. You’ll notice consistent results once you standardize thickness, resting, and thermometer use.
Choosing the Right Cooking Method: Poaching, Sous-Vide, and Pan-Searing
You can poach chicken gently to keep it tender and prevent overcooking—maintain a low simmer and monitor internal temperature. Use sous‑vide when you want precise, repeatable results; set the temperature for the exact doneness and hold as needed. Finish with a hot pan sear to build flavor and lock in moisture with minimal additional cooking.
Gentle Poaching Technique
When aiming for reliably tender, evenly cooked chicken breast, choose gentle poaching: you’ll simmer the meat in barely‑hot liquid (about 160–180°F / 71–82°C) so it cooks slowly and stays moist. You control gentle heat precisely, preventing muscle contraction that dries meat, while achieving subtle flavor infusion. Use a shallow pan or saucepan, fully submerge trimmed breasts, and monitor temperature with an instant‑read probe.
- Start with cold stock or seasoned water to extract and layer taste.
- Maintain 160–180°F; adjust heat rather than boiling.
- Cook until internal temperature reaches 150–155°F, then rest to carryover cook.
- Finish with herbs, citrus, or a quick sear for texture contrast.
Poaching is forgiving, efficient, and scalable for innovative home cooks. It rewards measured tweaks and consistent timing for repeatable results.
Precision Sous‑Vide Cooking
After mastering gentle poaching, try precision sous‑vide for laboratory‑like control over doneness and texture. You set a precise water-bath temperature, use sous vide precision to hold chicken at the exact pasteurization range, and eliminate guesswork. Vacuum sealing removes air, guarantees even heat transfer, and locks in marinade or aromatics without dilution. You’ll schedule cook time by thickness rather than weight; thicker breasts need longer holds, but not higher temps. When the bath finishes, you’ll rest the bag briefly to stabilize juices before opening. This approach gives consistent, tender results every cook, scales easily, and invites experimentation with temperatures to dial texture. Adopt calibrated thermometers and reliable immersion circulators to retain control and repeatability. Track variables and document outcomes to refine your signature chicken recipe.
Searing for Moisture
Although sous‑vide and poaching set precise internal doneness, a hot, controlled sear locks in juices and creates the Maillard flavors that make chicken taste finished. You’ll use a sizzling technique to form a thin, flavorful crust without overcooking interior; rest briefly to let carryover redistribute juices for peak moisture retention. Keep pan very hot, use oil with high smoke point, and pat breast dry to guarantee immediate browning. Flip once; finish in oven if thickness demands. For innovation, experiment with flavored fats or quick basting to amplify crust complexity while preserving tenderness. Control smoke, monitor temperature, and time each stage precisely. Always.
- Preheat pan to very hot.
- Dry and oil the breast.
- Sear 1–2 minutes per side.
- Rest 5 minutes before serving.
How to Sear Chicken Breast for a Juicy Interior
While you want a dark, caramelized crust, you also need to control heat and timing to keep the interior juicy. You’ll pat breasts dry, score thinly if uneven, and season just before cooking so salt doesn’t draw moisture. Use a heavy skillet and oil with a high smoke point; let it shimmer but not smoke. Start on medium-high to trigger crust formation, then reduce to medium as edges color—this is a deliberate searing technique balance that prevents overcooking. Press only briefly to guarantee full contact; resist flipping until the crust releases naturally. Once both sides are golden, finish with residual heat or a brief pan rest covered to equalize juices without prolonged exposure. Rest on a wire rack five minutes to let fibers relax; slice across the grain to preserve succulence. Iterate: tweak heat, pan mass, and contact time to refine your method. Measure results and adjust accordingly.
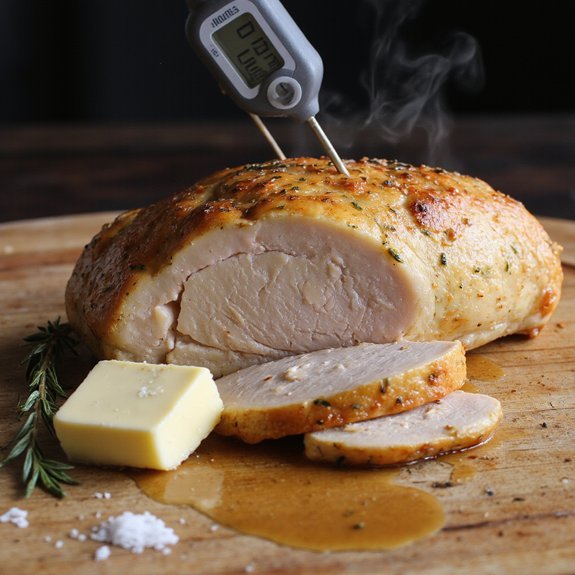
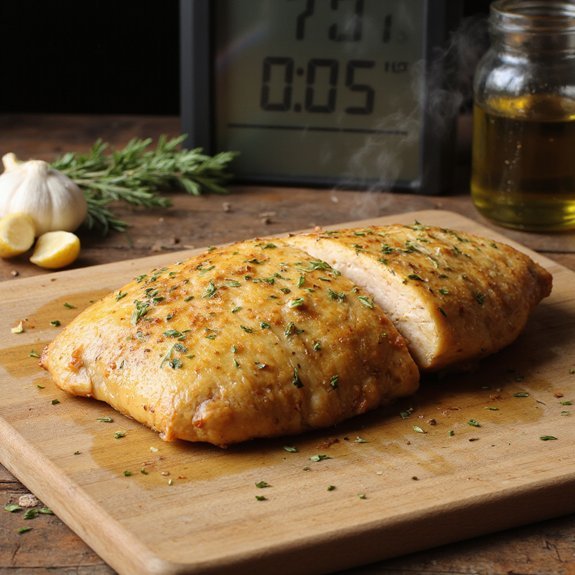
Temperature Targets and Using a Meat Thermometer
To be sure the interior is both safe and juicy, aim for an internal temperature of 165°F (74°C) as measured in the thickest part of the breast—insert the probe horizontally into the center and avoid touching bone or the pan. Use a reliable meat thermometer and verify target temperatures rather than relying on time or appearance. Calibrated digital probes give consistent reads; instant-read thermometers speed checks during searing and oven finishes. Develop a simple protocol: probe, record, adjust heat. When you monitor temps proactively, you’ll prevent overcooking and achieve repeatable results.
- Calibrate your thermometer monthly against boiling water.
- Probe at the thickest point; record peak reading.
- If temperature is below target, continue cooking at moderate heat.
- Clean probe between uses to avoid cross-contamination.
This approach is precise, efficient, and built for cooks who want innovative control over doneness. Track readings to refine timing and delivery every cook consistently.
Resting, Slicing, and Letting Juices Redistribute
After removing the breast from heat, let it rest on a cutting board, loosely tented with foil, for 5–10 minutes so juices redistribute and the internal temperature evens out—this prevents dry slices and gives you a consistent final doneness; only slice once the meat has stopped steaming. During the resting period the muscle fibers relax and trapped juices reabsorb; if you cut too soon those liquids run out. Use the time to plan your slice thickness based on serving needs: thinner slices for sandwiches and salads, thicker for plated mains. Hold the breast steady with a fork and cut with a sharp knife in smooth motion to avoid tearing. Measure slice thickness with a ruler until you develop muscle memory. If you want an innovative edge, experiment with brief, controlled pressure between slices to redistribute juices further before plating. Rest deliberately—it’s the simplest technique that preserves moisture.
Quick Sauces, Pan Juices, and Finishing Techniques
Once the breast has rested and you’re ready to slice, don’t discard the pan juices — they form the quickest, most flavorful base for finishing sauces. Use them to deglaze, reduce, and bind simple emulsions: a splash of wine or stock, a pat of butter, and a squeeze of citrus elevate texture and mouthfeel. Choose sauce types that complement seasoning and cooking method—pan-roasted prefers herb-butter, seared benefits from a wine-reduction, and grilled matches chimichurri or yogurt-based dressings. Focus on finishing touches that boost moisture and gloss without masking the chicken.
- Deglaze with wine or stock, reduce to concentrate.
- Mount with cold butter or olive oil for sheen and silk.
- Add acid or condiments (mustard, yogurt, soy) for balance.
- Stir in fresh herbs or aromatics at the end for brightness.
Taste, adjust salt, and plate immediately to preserve juiciness and flavor. Experiment confidently with bold, controlled contrasts today.
Practical Timing Charts and Troubleshooting Tips
Timing charts give you reliable cook windows for common breast sizes and methods, and they’ll help you hit safe internal temps without overcooking. Use a compact chart: thickness (¾–1 in, 1–1½ in, 1½–2 in) vs method (pan-sear, oven roast, poach, sous-vide) and target temp (145–155°F for moist texture). Rely on timing techniques that consider carryover: remove from heat 3–5°F below target for thicker breasts. For innovation, map charts to your gear—convection shortens times, sous-vide widens safe windows. Calibrate your thermometer and test one breast to validate the chart before batch cooking. Apply troubleshooting methods when results vary: underdone—lower temp and extend short interval; dry—reduce heat and shorten time or brine next time. If surface is burnt but center raw, lower pan temp and finish in oven. Keep notes: record weight, time, temp, and outcome so your charts evolve into a precise system that consistently delivers juicy breast results.