You can cook chicken straight from the freezer if you follow strict safety steps and reach an internal temperature of 165°F. Use lower, even heat and expect about 1.5× the normal cooking time to avoid cold centers. Risks include uneven cooking and bacterial survival. Below are proven methods and timing tips to keep it safe and tasty.
Key Takeaways
- Cook frozen chicken until the thickest part reaches 165°F (74°C) with a calibrated probe thermometer.
- Increase cooking time to about 1.5× fresh-cook time; bone-in pieces need 30–50% longer.
- Use oven (325–375°F), Instant Pot, air fryer, or skillet, following device-specific frozen-chicken guidelines.
- Avoid partial cooking, prevent overcrowding, and space pieces ~1 inch apart for even heat circulation.
- Apply wet sauces or glazes during the final 5–10 minutes and rest chicken 5–10 minutes before serving.
Safety and Temperature Guidelines for Frozen Chicken
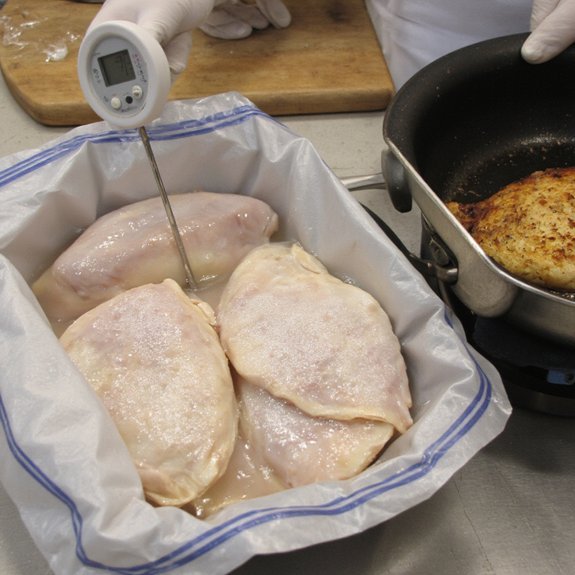
Frozen chicken can carry Salmonella and Campylobacter, so you should treat it as potentially hazardous and make sure it reaches a safe internal temperature of 165°F (74°C) throughout. When you cook from frozen, monitor core temperatures with a calibrated probe thermometer and verify doneness in the thickest part. Prioritize food safety by avoiding partial cooking, which lets bacteria survive and multiply. Novel approaches—like sous-vide after thawing or pressure cooking directly from frozen—must still rely on validated cooking temperatures and times; don’t assume high appliances eliminate risk. Rest cooked poultry briefly so residual heat completes pathogen inactivation. If you use marinades or sauces, heat them to safe levels before combining with finished meat. Keep cross-contamination in check: separate raw frozen packages from ready-to-eat items, sanitize surfaces, and wash hands. Your innovation should focus on reliable measurement, process control, and documented checks rather than shortcuts that compromise safety and compliance.
Oven-Baking Frozen Chicken: Methods and Timings
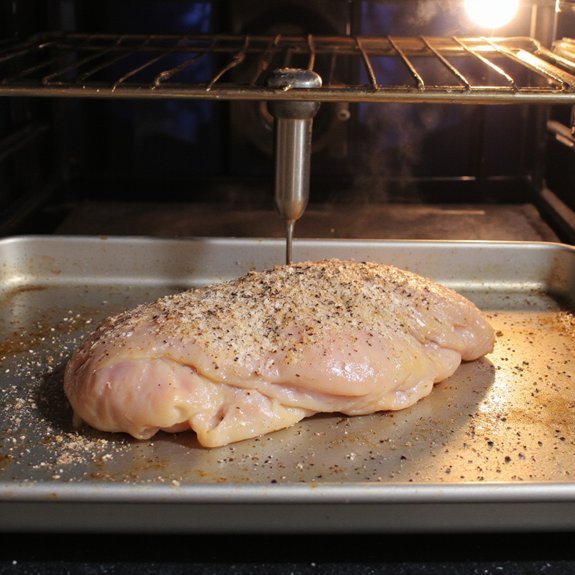
When you bake frozen chicken in the oven, plan for at least 1.5× the fresh-cook time and always verify doneness with a calibrated probe thermometer reading 165°F (74°C) in the thickest part; increased time and even heating (single layer, skin-side up) help guarantee the core reaches a safe temperature without overcooking the exterior. Use a moderate oven temperature to allow heat penetration—325–375°F is typical—and expect longer cooking duration than fresh meat. Roast bone-in pieces 30–50% longer; boneless breasts and thighs need adjusted timing. Covering loosely with foil speeds internal heat transfer while preventing extreme surface browning. Monitor the probe in the thickest area and rest 5–10 minutes to equalize residual heat. Use the quick reference table below to estimate time, then rely on thermometer verification.
| Cut | Oven Temp | Estimated Cooking Duration |
|---|---|---|
| Breast | 350°F | 30–45 min |
| Thighs (bone-in) | 350°F | 40–60 min |
Prioritize thermometer readings over visual cues every time.
Stovetop and Pan-Searing Straight From Frozen
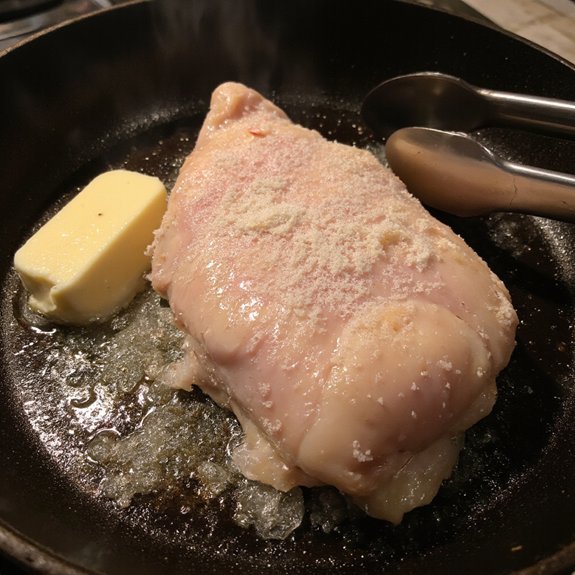
When you pan-sear frozen chicken, start with a hot skillet and a thin layer of oil to create immediate contact heat that promotes browning and reduces sticking. Use medium-high heat at first, then lower to medium; you’re looking at about 6–8 minutes per side for thin cuts and longer for thicker pieces, and use an instant-read thermometer to confirm doneness. Target an internal temperature of 165°F (74°C) and watch for even color with no pink near the bone to avoid undercooking and bacterial risk.
Pan-Searing Technique
A hot, heavy skillet lets you pan-sear chicken straight from frozen, but you’ll need to manage heat, moisture and time to avoid a burned exterior or an undercooked interior. You’ll pat the surface dry where possible, add a high-smoke-point oil, and create space so pieces don’t steam. Use moderate-to-high heat to build a crust—pan searing benefits include flavor concentration and a barrier that helps retain juices during finishing. Flip only once to preserve the sear, monitor ideal temperature to avoid excessive smoke. Finish by lowering heat and covering briefly so residual heat cooks through without overbrowning. Rely on a thermometer to confirm doneness and prioritize safe internal temperature rather than visual cues alone. Treat frozen chicken as higher-risk and proceed with caution always now.
Timing and Temperature
Because frozen chicken holds more moisture and cooks unevenly, control heat and watch time closely: preheat a heavy skillet to medium-high so the surface reaches roughly 375–400°F (measured indirectly by oil shimmering), sear the pieces 3–6 minutes per side to build a crust, then reduce to medium-low and cover or baste to finish cooking without burning. Use an instant-read thermometer to verify internal temperature reaches 165°F; probe the thickest part and avoid touching bone, since undercooking risks bacterial survival. You can adapt searing within hybrid cooking methods—finish in a low oven or add a splash of stock to accelerate heat transfer—preserving frozen flavors while minimizing surface charring. Err on the side of time rather than high heat; slow, monitored finishing reduces risk, improves texture.
Pressure Cooking and Instant Pot Techniques
You can use an Instant Pot to cook frozen chicken quickly by using the appliance’s high-pressure setting and the required liquid to build steam. Follow manufacturer pressure and cooking-time guidelines — generally about 10–15 minutes for boneless and 20–25 minutes for bone-in pieces — and use natural release when recommended to promote even doneness. Always confirm safety by checking the internal temperature reaches 165°F (74°C) with a probe thermometer before serving.
Instant Pot Basics
When using an Instant Pot to cook frozen chicken, follow manufacturer instructions and remember that pressure cooking speeds heat penetration but doesn’t sterilize unless the internal temperature reaches 165°F (74°C). You should understand instant pot functions and pressure cooking essentials before you start: sealing ring position, valve settings, and proper liquid minimums. Inspect seals and use the recommended rack to avoid meat contacting the pot bottom. Use a food-grade thermometer to verify safety; don’t rely on time alone. You’re innovating technique, but prioritize validated steps to prevent undercooking or pathogen survival. Venting and depressurization methods affect carryover cooking and safety, so control them deliberately. When in doubt, stop and confirm temperatures rather than guessing. Document methods and iterate based on measured outcomes and data.
Pressure and Cooking Times
Although pressure cooking shortens overall cook time, it’s the internal temperature that determines safety, so plan times around thickness and weight and always confirm doneness with a food-grade thermometer. When you use pressure cooking for frozen chicken, expect longer pressure-up time; factor that into timing adjustments and recipe scaling. For boneless breasts, use 8–12 minutes high pressure; for bone-in pieces, 12–15 minutes. Always add at least 1 cup liquid and choose natural or quick release per texture goals. Innovate with post-cook marinades or the sauté finish to improve browning. Check seals, follow manufacturer guidance, and remember inconsistent venting changes results.
| Cut | High-pressure time |
|---|---|
| Boneless breast | 8–12 min |
| Bone-in thigh | 12–15 min |
| Whole small bird | 20–25 min |
Maintain logs to refine your timing over trials.
Safety and Internal Temperature
How hot does chicken need to be to be safe? You must reach an internal temperature of 165°F (74°C) to reliably destroy pathogens like Salmonella and Campylobacter. With pressure cooking or an Instant Pot, safety significance can’t be overstated: frozen meat heats unevenly, so you need precise temperature monitoring. Use a calibrated instant-read or probe thermometer through the thickest part, avoiding bone contact, and verify multiple spots when working with pieces. Don’t rely on time, pressure setting, or visual cues alone. If you innovate with multi-stage cooking—sear, then pressure—check temp after depressurizing and before serving. If any spot reads below 165°F, continue cooking and retest. Prioritize monitoring to manage risk and guarantee repeatable, safe results. Document readings to improve future process control and safety.
Air Fryer Tips for Crispy Frozen Chicken
Many home cooks choose an air fryer because it crisps frozen chicken quickly with less added fat. You can get safe, crispy results if you follow proven cooking tips and monitor internal temperature. Preheat the unit, arrange pieces for airflow, and use digital probe thermometers; frozen centers need longer time and staggered trays raises risk. Use moderate heat (around 375°F/190°C) to brown without overcooking exterior, flipping halfway and checking doneness at 165°F (74°C). Innovative presets help, but verify by temp.
Preheat, space pieces for airflow, cook at 375°F and verify chicken reaches 165°F for safe, crispy results.
- Preheat 3–5 minutes for stable airflow.
- Space pieces 1 inch apart to avoid steaming.
- Start at 375°F and extend time in 3–5 minute increments.
- Use an instant-read or probe thermometer, especially for bone-in pieces.
You’ll reduce food-safety risk by testing multiple pieces, avoiding overcrowding, and adapting time to size and model variability. If you innovate, log times and temps per model to refine repeatable protocols and reduce variability.
Seasoning, Sauces, and Serving Suggestions
When you season or sauce frozen chicken, remember flavors won’t penetrate as quickly as with thawed meat, so prioritize surface rubs, finishing sauces, and confirming safe doneness before serving. You should use bold seasoning combinations: salt, smoked paprika, garlic powder, and a touch of brown sugar to build surface flavor that tolerates longer cook times. Apply rubs right before cooking to avoid ice creating slick surfaces that block adhesion; pat pieces dry where possible. For sauce pairings, reserve wet sauces for the last five to ten minutes of cooking or as a post-cook glaze to avoid undercooking and bacterial risk. Use a thermometer to verify 165°F (74°C) at the thickest point; don’t rely on color. For innovative service, offer contrasting textures and acid: crunchy herbs, pickled slaw, citrus wedges, or a yogurt-citrus drizzle. Label leftovers promptly and chill within two hours to minimize food-safety hazards. Serve immediately after.