You’ll want firm, properly thawed shrimp, cleanly deveined and patted dry before they hit a hot pan. Heat oil until it shimmers, add shrimp in a single layer, and cook briefly until opaque and slightly firm—about 1.5–2 minutes per side for large shrimp. Mastering timing and temperature makes the difference; next, learn the precise steps to avoid overcooking.
Key Takeaways
- Choose fresh or properly thawed shrimp, peel/devein and pat dry for even cooking and flavor adherence.
- Season lightly with salt (~1% shrimp weight), oil, and aromatics; marinate no more than 10–20 minutes.
- Preheat a skillet to high (400–450°F) with a high-smoke-point oil and avoid crowding the pan.
- Sear shrimp 30 seconds–2 minutes per side depending on size, flipping once for even browning.
- Cook to opaque, firm flesh and 120–125°F internal temperature, then remove from heat to prevent overcooking.
Choosing the Right Shrimp: Fresh vs. Frozen and Shell Options
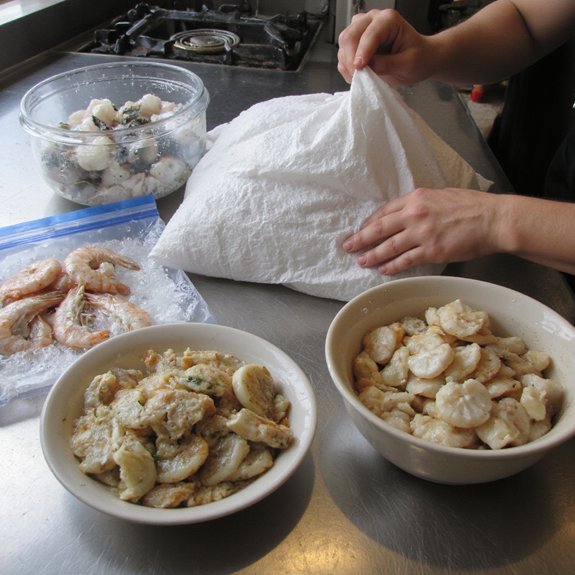
Why choose fresh or frozen shrimp? You evaluate supply chain transparency, enzymatic activity, and cold-chain integrity to select shrimp that meet performance parameters for texture and flavor. If you work with fresh shrimp, you’ll get minimal ice glaze and immediate enzymatic state, but you’ll need rapid use due to limited biochemical stability. If you use frozen shrimp, you’ll gain consistent sizing, standardized block freezing, and reduced microbial variability via blast-freezing protocols that lock texture and simplify inventory. Choose shells-on for maximal moisture retention, structural protection during high-heat sautéing, and flavor compounds concentrated in exoskeleton lipids; you’ll peel when service demands immediate plating. Opt for deveined and peeled when processing time, uniform heat transfer, and downstream marinades require direct surface contact. In experimental recipes, test both fresh shrimp and frozen shrimp across cooking times and shell conditions to validate repeatable outcomes and iterate on your stovetop techniques and precisely.
Thawing and Storing Shrimp Safely

When you handle shrimp, control time and temperature to prevent bacterial growth and preserve texture. You should thaw frozen shrimp using cold-water immersion or refrigeration thawing methods: keep shrimp sealed, submerge in cold water and change water every 30 minutes for rapid thawing, or move shrimp to the refrigerator for 12 to 24 hours for gradual, controlled thaw. Avoid room-temperature or hot-water thawing, which accelerates bacterial proliferation and protein denaturation. For safe storage, maintain chilled shrimp at 32 to 40°F (0 to 4°C) and use within 24 to 48 hours of thaw; frozen shrimp should be kept at 0°F (−18°C) for long-term quality. Package shrimp tightly to limit oxygen exposure and label with thaw date to support inventory control. If you need to pause prep, refreeze only if shrimp was thawed under refrigeration and shows no off-odors. These procedures optimize food safety, texture, flavor while enabling innovative workflow.
Cleaning, Deveining, and Prepping Shrimp
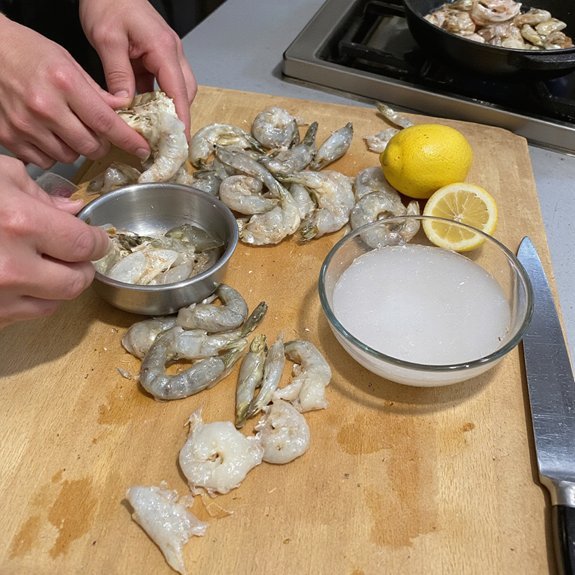
Several exact steps will guarantee shrimp are clean, safe, and cook evenly. You’ll first inspect shells for damage and off-odors; reject any that smell sour. Rinse under cold running water to remove surface debris, applying targeted cleaning techniques: gentle brush for shell crevices and agitation to dislodge sand. Next, decide whether to leave tails for presentation.
- Remove shell: peel from legs upward, leaving or removing tail per recipe.
- Devein: use a paring knife to slit the back, lift and extract the dark tract — a precise deveining process reduces grit and visual defects.
- Dry and size: pat shrimp dry with paper towels, then group by size for even heat exposure.
You’ll keep shrimp chilled on ice until cooking to minimize bacterial growth. These steps prioritize reproducible results and streamline stove-top workflows for innovative cooks seeking consistent textures and clean flavor. and efficient preparation routines daily.
Seasoning and Simple Marinades
You’ll build flavor layers with a restrained, measurable approach: a base of salt (about 1% of shrimp weight), a neutral oil to transfer heat and prevent sticking, and focused aromatics — garlic, citrus zest, chopped herbs, or crushed chile — added in small quantities to avoid overpowering sweetness. You’ll weigh shrimp and calculate salt, select a high‑smoke‑point oil, and prioritize quantification over guesswork. For easy seasoning, use salt, freshly ground pepper, and a calibrated acid (lemon or lime juice, ~0.5–1% by weight) or zest for brightness without denaturing proteins. For flavorful marinades, limit contact time—10–20 minutes for standard shrimp—to prevent texture loss; use a low‑percentage oil, a single acid, and one concentrated herb or spice to retain intrinsic sweetness. Pat shrimp dry before cooking to promote even seasoning adhesion and remove excess marinade to avoid steaming. Make single-variable adjustments so you innovate predictably and document results precisely.
Sautéing Shrimp on the Stove
You’ll choose the right shrimp—peeled and deveined large (16–20) or jumbo (10–15) counts give even cooking, while smaller shrimp cook faster. Pat them dry, trim tails if desired, and apply a measured seasoning or light marinade so surface moisture won’t inhibit browning. Sauté in a hot pan over medium-high heat about 1–2 minutes per side for large shrimp (until opaque, firm, and 120–140°F internal), reducing time for smaller sizes to prevent toughness.
Selecting Shrimp Type
A shrimp’s size and shell state determine sauté timing and texture. When selecting shrimp, prioritize uniform size and predictable shell-on or peeled options; shrimp varieties (white, tiger, brown) offer different moisture and sweetness profiles. You’ll choose based on desired cook speed and mouthfeel. Consider three technical criteria:
- Size grading: larger shrimp (16/20) need longer heat; smaller (31/40) finish rapidly.
- Shell state: shell-on gives protection and fat barrier; peeled reduces cook time.
- Freshness indicator: translucent flesh, neutral odor, firm bounce.
You’ll standardize selection for repeatable results and scalable workflows. Use this method to optimize sauté cycles and achieve targeted texture without overcooking. Adjust procurement specs and labeling so your team can enforce consistency across batches and innovate cooking parameters reliably in production.
Prep and Seasoning
Having standardized shrimp selection, prep each batch for sauté by shelling or leaving shells intact, removing the vein, and patting specimens dry to promote consistent Maillard development and prevent steaming. You’ll calibrate size uniformity, trim tails for presentation, and score thick flesh to guarantee even heat transfer. Choose prep techniques that prioritize surface dryness and minimal handling; use a light salt brine for 10–15 minutes to improve texture and flavor uptake. For seasoning options, favor volatile, high-heat-resistant oils and powdered spices—smoked paprika, ground coriander, dehydrated citrus zest—and finish with calibrated acid (lemon, verjuice) post-sear to lift profiles without denaturing proteins. You’ll weight portions and season precisely to support reproducible, inventive sauté outcomes. You should document variables and iterate seasoning ratios for scalable flavor innovations.
Cooking Time and Doneness
Most cooks aim for a narrow doneness window: remove shrimp from heat when their flesh is opaque, firm but still pliant, and registering about 120–130°F (49–54°C) with carryover bringing them toward 135°F (57°C). You’ll monitor time and texture rather than rely on arbitrary minutes; size, shell-on or peeled state, and shrimp varieties alter heat transfer. Use an instant-read probe for repeatability. Apply these steps:
- Heat pan hot, add fat, sear large shrimp 1.5–2 minutes per side.
- Medium shrimp: 1–1.5 minutes per side; adjust for shell-on.
- Small shrimp: 30–45 seconds per side; finish with residual heat.
You’ll document results, refine searing temperature, and iterate cooking techniques to standardize doneness across shrimp varieties. Measure and record variables to accelerate reproducible, innovative outcomes.
Pan‑Searing for Browning and Texture
To achieve pronounced Maillard browning and crisp edges, heat a heavy skillet until it’s shimmering and nearly smoking, then add a thin film of oil. You place dry, seasoned shrimp in a single layer and resist moving them so a stable sear forms in 60–90 seconds per side, depending on size. You monitor internal temperature and remove shrimp at 120–125°F (49–52°C); carryover will finish cooking, preventing toughness from overcooking.
High Heat Browning
Heat a heavy skillet until its surface reaches roughly 400–450°F (200–230°C); that high, dry heat triggers rapid Maillard browning that builds a thin, flavorful crust while minimizing thermal penetration into the shrimp. You’ll use high heat techniques to sear quickly, producing targeted flavor development without extended exposure. Pat shrimp dry, add a high smoke point oil, and avoid crowding so surface temperature stays stable. Control and repeatability matter; calibrate burner, preheat, and measure surface temperature if you can. Apply this checklist:
- Preheat and stabilize skillet for 3–5 minutes.
- Single layer, minimal handling; flip once.
- Use oil with smoke point >400°F, finish with acid for contrast.
Execute confidently; these parameters optimize crust, texture, and reproducible results. Record settings to iterate and refine your process rapidly.
Avoid Overcooking
While searing at high temperature produces a Maillard crust, you must stop cooking the shrimp the instant they turn opaque and begin to firm to avoid tough, rubbery texture. Monitor visual and tactile cues: opaque flesh, spring-back when pressed, and a slight curl indicate doneness; translucent centers signal more time. Use residual heat by transferring shrimp off the pan to finish carryover cooking for 30–60 seconds, which prevents overcooked shrimp while preserving crust. Control pan temperature—reduce heat if surface browning accelerates to avoid burning. Time individual pieces: medium shrimp typically need 1–1.5 minutes per side; jumbo 2–2.5. Calibrate with a probe thermometer if desired: target internal 120–125°F (49–52°C) for ideal texture. Record outcomes and you’ll adjust parameters for repeatability improvement.
Poaching and Gentle Cooking Methods
Poaching provides the most reliable control for tender, evenly cooked shrimp; you’re maintaining a low, steady liquid temperature (about 120–135°F / 49–57°C) so the shrimp’s proteins coagulate gradually without contracting and toughening. Use clarified butter, court-bouillon, or a light stock to transmit heat evenly and carry flavor without raising surface temperature. You’ll rely on poaching techniques and calibrated gentle simmering to preserve texture and translucency.
- Select a shallow pan that allows a single layer; this guarantees uniform thermal exposure.
- Use a calibrated thermometer and adjust heat to hold the target range; avoid visible bubbling.
- Remove shrimp with a slotted spoon into an ice bath if you plan to halt cooking for integration into cold preparations.
Operate with methodical control: monitor fluid temperature, minimize agitation, and standardize liquid composition. These measures let you innovate with infusions and sauces while keeping structural integrity and consistently reproducible results.
Timing, Doneness, Common Mistakes, and Flavor Variations
Because timing and temperature govern texture, you must stop cooking the shrimp just before they reach their final texture: for poaching aim for 120–135°F (49–57°C) and for direct‑heat methods pull them at roughly 125–140°F (52–60°C), allowing brief carryover to finish; visually, properly cooked shrimp turn uniformly opaque, firm up, and form a loose C (an O indicates overcooking).
You’ll monitor carryover closely with a probe. Assess shrimp textures by touch and sight: resilient give, uniform opacity indicate doneness. Common mistakes include overcrowding, inconsistent heat, and ignoring residual heat; each causes rubbery or undercooked results. For control, stagger batches, preheat pan zones, and calibrate timers. Flavor variations should be systematic: acid brightens, fat amplifies, smoke adds complexity. Experiment with quick compound butters, infused oils, citrus-fermented glazes, and spice pastes to explore cooking variations while preserving precise doneness. You’ll document what works, iterate and optimize protocols for repeatable shrimp outcomes.