

If your toilet keeps running, you can usually fix it yourself by checking a few simple parts: the flapper, the fill valve, and the float. Turn off the water, inspect for worn rubber, misalignment, or mineral buildup, then replace or adjust the faulty component. The steps are straightforward, but the exact fix depends on what you find, so keep going to pinpoint the cause and apply the right repair.
Key Takeaways
- Check inside the tank with the lid off to observe whether water runs, hisses, or intermittently refills.
- Test for a leaking flapper by adding food coloring to the tank and watching for colored water in the bowl.
- Replace a warped, cracked, or mineral-coated flapper and shorten/lengthen its chain so it seals fully.
- Adjust or replace the float/fill valve if water level is too high or the valve doesn’t shut off.
- Turn off the water, drain the tank, inspect and clean valve seats and seals, and call a plumber for persistent leaks.
Common Causes of a Running Toilet

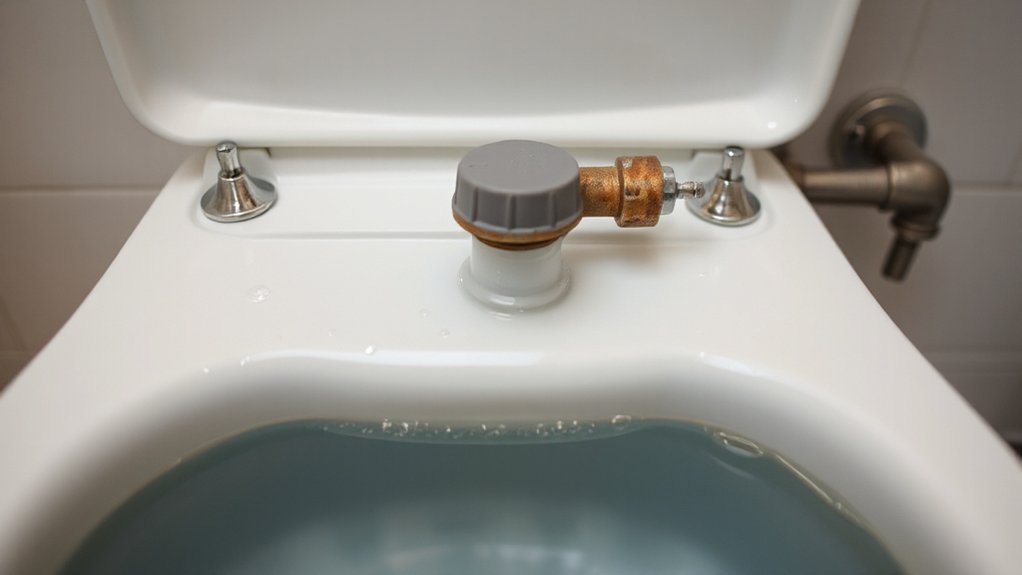
When your toilet runs, it’s usually because one or more internal parts aren’t sealing or moving correctly; common culprits include a worn flapper that won’t close, a misaligned or corroded fill valve, a faulty float that doesn’t stop water flow, a leaky flush valve seat, or debris and mineral buildup affecting seals and linkage. You should inspect flapper integrity, chain length, and seat condition since a warped or hardened flapper causes continuous leakage. Check the fill valve for wear or mineral crust that prevents shutoff; a defective refill tube or float will override water level settings. Corrosion at linkage or mounting points can misalign components. Routine toilet maintenance prevents failures, preserves parts life, and supports water conservation by eliminating persistent losses from unnoticed leaks.
How to Diagnose the Problem
How can you pinpoint what’s causing the toilet to run? Start with systematic symptom identification: note continuous water, intermittent refilling, or hissing. Remove the tank lid and observe toilet components during a flush and while idle. Check the fill valve for steady trickle, the float for correct shutoff height, the overflow tube for constant flow, and the flapper for seating and sealing. Test for silent leaks by adding food coloring to the tank; if color appears in the bowl without flushing, the flapper or flush valve seat is leaking. Inspect chain slack and alignment to guarantee proper flapper operation. Verify refill tube position and gasket integrity at the base of the fill assembly. Record observed symptoms to guide targeted repair steps.
Fixing a Worn or Misaligned Flapper
Inspect Flapper for Wear
- Inspect the flapper for wear visually and by touch. You’ll lift the tank lid, press the flapper to seat it, and look for cracks, glazing, or deformation. Note that flapper materials (rubber, silicone, or thermoplastic) affect resilience and flapper lifespan; rubber can degrade faster.
- Check sealing surface: run a fingernail around the rim to detect hard spots or grooves.
- Measure deformation: if the flapper won’t lie flat against the valve seat, it’s distorted beyond serviceable limits.
- Look for mineral buildup: deposits can prevent a tight seal and indicate surface fatigue.
If you find cracks, significant hardening, or persistent leaks after cleaning, replace the flapper. Use compatible material and size for reliable sealing and longevity.
Adjust Chain Length
If the flapper isn’t seating because the chain’s too tight or too slack, adjust its length so the flapper can drop fully and seal without excess slack that can tangle under the flapper. First, flush and hold the flapper open to observe chain tension; note if the chain lifts the flapper before the flush completes or droops beneath it. For length adjustment, detach the chain from the flush lever hook and select a link that allows the flapper to rest on the seat with 1/2 inch of slack. Reattach and cycle several times, checking for consistent seating and no binding. Trim or replace corroded chains; use stainless or nylon-coated chain for reliable chain tension and to prevent future misalignment.
Adjusting or Replacing the Fill Valve and Float
Most running toilets trace back to a misadjusted or failing fill valve and float, so you’ll want to inspect and correct these components before replacing the whole assembly. Shut off water, flush to drain the tank, then observe the fill valve operation and note whether the float stops the flow at the correct waterline. Common corrective steps:
- Verify float adjustment: lower or raise the float to change shutoff height; small changes affect seal pressure.
- Tighten or replace a leaking fill valve: confirm the refill tube is secure and the valve cup moves freely.
- Replace worn seals or the entire fill valve assembly if adjustment doesn’t stop water flow.
Test after each correction, checking for stable water level and absence of trickle.
**Removing Mineral Buildup and Cleaning Components**
**1. Turn Off the Water Supply**
Before touching any components inside the tank, make sure to turn off the water supply to stop the flow and lower the water level. This allows for safe access to clean the valves, fill tube, and flapper without causing spills. Shut the shutoff valve located at the wall or base, then flush the toilet to drain most of the water. Confirm that the tank remains low before proceeding.
Next, verify that the water supply line is closed by checking for no flow and observing the tank’s refilling behavior. Inspect the toilet valve and surrounding fittings for mineral buildup that could prevent a complete shutoff. If the shutoff valve is stiff, use a wrench, but be sure to protect the fittings to avoid damage. Working on a dry tank minimizes mess and allows for clean and safe part removal without constant leaks.
**2. Remove and Soak Parts**
Before scrubbing, remove the flapper, fill valve cap, and any removable clips or tubes. This allows the cleaning solution to directly access mineral deposits and prevents debris from spreading inside the tank. Use standard removal techniques such as depressing tab clips, unhooking chain links, and twisting off caps counterclockwise. Place the removed parts in a plastic bin and cover them with a descaling solution according to the manufacturer’s instructions. Soaking the parts helps loosen calcium and lime buildup without needing aggressive scrubbing. While the parts soak, inspect the tank for loose hardware or cracks to avoid reinstalling faulty components. After the recommended soaking time, rinse the parts thoroughly with clean water and check the seals and elastomers for any deterioration. Replace any damaged items before reassembling.
**3. Scrub Mineral Deposits**
Next, scrub both the tank and the parts to remove mineral buildup, using non-abrasive tools and appropriate cleaners to avoid damaging rubber seals or plastic surfaces. Drain the tank, and disassemble the float, flapper, and fill valve as necessary while inspecting components for pitting or deterioration. Apply targeted cleaning solutions to any scale spots and let them sit according to label instructions to dissolve deposits without harming the elastomers.
Use a soft brush and nylon scrub pad for visible scale, and avoid metal tools that could nick or damage the parts. Choose mild acidic cleaners such as vinegar or diluted citric acid for calcium and lime, or commercial descalers that are safe for rubber and plastic materials. Rinse thoroughly, dry the seals, and reassemble the components, replacing any parts that remain stiff or porous. Test the toilet multiple times to confirm that the leak has been resolved.
**4. When to Call a Professional**
How can you tell if a running toilet needs professional help? Look out for urgent signs: persistent noise even after basic fixes, continuous water flow, or repeated cycling of the flush mechanism. If you’ve replaced the flapper, adjusted the float, and cleaned the deposits but the problem keeps returning, it’s time to call a professional.
You should also contact a plumber if you notice hidden leaks (such as water meter movement with no fixtures running), damaged fill valve assemblies, corroded trip levers, or irregular tank-to-bowl refill patterns. Professionals have the tools to diagnose issues like valve seat wear, inlet line problems, and pressure-related faults using pressure gauges and leak detection equipment. If your toilet is on a shared supply line or you’ve experienced multiple failures after attempting repairs yourself, hiring a licensed plumber can help prevent water waste and structural damage.
**Conclusion**
You’ve seen the usual culprits—flappers, fill valves, floats and mineral buildup—and you’ve learned how to pinpoint each one. Start simple: inspect the tank, shut off water, drain and replace a worn flapper; adjust or swap the fill valve or float if levels or seals are off; clean mineral deposits with vinegar or a brush. Test for leaks and proper shutoff. If repairs don’t stop the run or parts look damaged, call a plumber.