You want hard‑boiled eggs that peel cleanly every time. Start by choosing slightly older eggs and bringing them near room temperature. Use a gentle steam or a controlled boil, then shock them in an ice bath to separate the membrane. I’ll show you step‑by‑step tips, timing, and simple tricks that fix common problems so your eggs come out smooth and intact—here’s what to do next.
Key Takeaways
- Use eggs 7–10 days old; slightly older eggs have higher pH and peel more easily.
- Bring eggs to room temperature for 20–30 minutes to reduce cracking and uneven cooking.
- Pierce the blunt end with a clean pin to release pressure and reduce shell cracking.
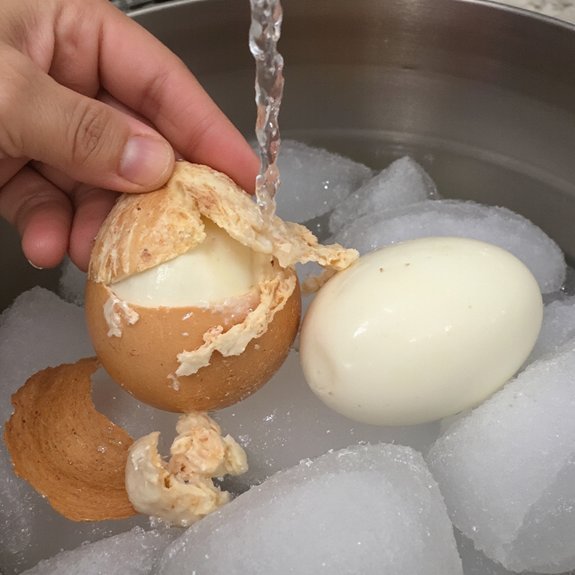
- Cook fully then immediately plunge eggs into an ice bath for 10–12 minutes to shrink the egg and separate the membrane.
- Tap, roll, and peel under cold running water, starting at the larger end to lift the membrane smoothly.
The Science Behind Why Eggshells Stick
Although it looks simple, shells stick because of chemistry and structure: the inner shell membrane clings to the albumen, and in fresh eggs the albumen is more acidic and protein-rich so it bonds tightly to that membrane. You’ll find that eggshell composition—primarily calcium carbonate with a porous matrix—creates a microstructure that anchors the membrane. The membrane structure itself is fibrous and adheres via hydrogen bonds and protein cross-links to the albumen’s proteins. When you heat an egg, those proteins denature and can fuse to the membrane; timing and thermal gradients determine how strongly they join. Rapid heating can tighten bonds near the membrane, while controlled denaturation leaves a thin separation zone that helps peeling. You’ll use this understanding to adapt methods and equipment: manipulate temperature change, cooling rate, and agitation to reduce adhesion. That targeted approach turns basic chemistry and structure into predictable, repeatable peeling outcomes every time.
Choosing the Best Eggs for Easy Peeling
If you want eggs that peel cleanly, pick ones that aren’t ultra-fresh—eggs about 7–10 days old usually work best because their whites have a higher pH and separate more easily from the membrane. Efficient egg selection means checking carton pack or sell-by dates instead of buy-fresh-now labels. You can innovate by keeping a rolling batch: label cartons with receipt dates so you’re using the ideal window.
Consider the freshness factor as a controllable variable in your process. Slightly older eggs don’t compromise flavor but improve peelability. If you raise or source eggs, note refrigeration slows aging but doesn’t reset interior chemistry; track lay dates. For commercial or home cooks seeking consistent results, standardize sourcing to the 7–10 day range, document outcomes, and iterate. That approach turns egg buying into a repeatable technique that reduces wasted time and delivers predictable, easy-peel eggs every time. Measure results and refine procedures.
Prep Tips Before Cooking: Piercing and Room Temperature
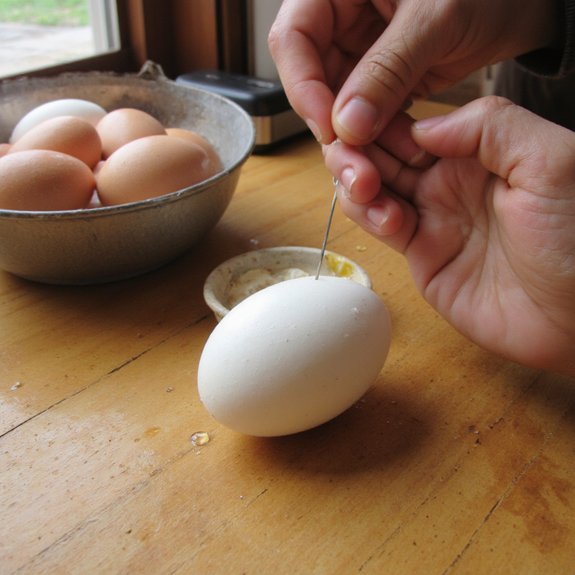
Because sudden heat makes shells more likely to crack, take eggs out of the fridge 20–30 minutes before cooking and, if you choose, pierce the blunt end with a pin to release the air pocket; this reduces cracking and helps the membrane separate for easier peeling. Let eggs sit at room temperature so the shell and white heat more evenly; that lowers internal stress and avoids shattered shells. When piercing eggs, use a clean pin or an egg pricker to make a tiny hole — not a crack — at the blunt end. Keep workflows efficient: arrange eggs in a single layer on a towel and avoid stacking. For innovation-minded cooks, try a micro-perforation tool to standardize hole size and repeatability. Always sanitize tools between batches. These prep steps are small but measurable: they cut cracking and improve peelability, making downstream cooking and cooling more predictable and repeatable.
Boiling Method for Smooth, Intact Whites
For smooth, intact whites, use older eggs—their higher pH helps the membrane release. Cook just until the white sets, then you must immediately shock the eggs in an ice bath to stop cooking and shrink the inner membrane. Together, older eggs and an instant ice bath make peeling clean and preserve intact whites.
Use Older Eggs
Use eggs that are about 7–10 days old when boiling; their higher pH and slightly larger air cell let the membrane pull away from the shell, so you’ll get smooth, intact whites. Prioritize egg freshness tracking and note shell quality when sourcing; slightly older eggs peel more reliably because the membrane separates from the shell. Implement a simple routine:
- Rotate stock so eggs age 7–10 days before use.
- Test shell quality visually; avoid hairline cracks.
- Label cartons with purchase dates for repeatable results.
This minimalist, experimental approach reduces variability and boosts peeling consistency. You’ll innovate by treating aging as a control parameter, improving outcomes without extra steps. Measure results, iterate on timing, and standardize the process in your kitchen or line.
Ice Bath Shock
After boiling, plunge the eggs immediately into an ice bath to stop the cooking and firm the whites, which helps the membrane pull away from the shell. You’ll use the ice bath benefits to create a controlled temperature shock that halts heat transfer and prevents overcooking. Rapid cooling contracts the egg interior, separating membrane from shell for smooth, intact whites and predictable peels. Work quickly: transfer eggs with a slotted spoon, refresh water or add ice to maintain low temperature, and leave eggs for at least five minutes. For batch processing, stagger boiling so you can cool each group efficiently. This method is simple, repeatable, and scalable—ideal when you want innovative reliability for consistent, easy-to-peel hard boiled eggs. Document timing to refine your process.
Steaming Method: A Gentler Alternative
When you steam eggs, gentle moist heat cooks the whites evenly while loosening the membrane, so shells slip off with minimal effort. You’ll use steaming benefits to reduce cracking and get consistent results; gentle cooking protects texture and yields a clean peel every time. Start with room-temperature eggs and a single layer in a steamer basket above simmering water. Cover and steam for eleven to twelve minutes for hard yolks, then plunge into an ice bath for five minutes to stop cooking and firm the membrane.
- Use one inch of simmering water and a fitted lid.
- Time precisely: eleven to twelve minutes depending on size.
- Cool rapidly to separate membrane from shell.
This method scales, saves water, and fits modern kitchens. You’ll adopt a repeatable, low-fuss routine that emphasizes control and predictability, ideal if you innovate recipes or batch-cook for meal prep. Try it reliably.
Baked or Pressure-Cooked Eggs: Quick Options
You can bake whole eggs at a low temperature for a hands-off, evenly cooked result. Or use a pressure cooker to cook eggs quickly with consistent whites and a tender yolk. In both cases you’ll stop cooking with an immediate ice-water shock to make peeling fast and clean.
Baking Whole Eggs
Although it sounds unconventional, baking whole eggs or using a pressure cooker gives you consistently cooked eggs that peel cleanly. You’ll use a simple baking technique: place eggs in a muffin tin or on a rack, bake at 325°F for about 25–30 minutes, then chill immediately. This yields uniform egg texture, easy peels, and reliable yolk doneness. Follow these quick steps:
- Preheat oven and arrange eggs.
- Bake at controlled temperature 25–30 minutes.
- Transfer to ice bath 10–15 minutes.
You’ll find this method scalable, low-maintenance, and well-suited to batch prep. Adopt it when you want predictable results without fiddling with boiling times, and you’ll get cleanly peeling eggs every time. Experiment with time adjustments for altitude and oven variability to refine results.
Pressure Cooker Technique
If baking eggs in the oven gave you consistent results, the pressure cooker offers an even faster route to cleanly peeled eggs. You’ll harness pressure cooker benefits: uniform heat, precise timing, and steam that gently sets whites, minimizing membrane adhesion. Use a trivet or cup to keep eggs off the base, add a half cup of water, and arrange eggs in a single layer. Lock lid, bring to high pressure for about 5 minutes for large eggs, then let pressure release naturally for a minute before quick release—timing varies by model. This method standardizes outcomes, reduces hands-on time, and improves consistency. For innovation-minded cooks, integrating pressure cooking refines egg peeling techniques and scales effortlessly for meal prep. Adopt it to accelerate breakfast and catering.
Rapid Cooling and Peeling
One quick step makes peeling fast: plunge baked or pressure-cooked eggs into an ice bath as soon as they hit ambient temperature to halt cooking and shrink the inner membrane away from the shell. You’ll speed separation, reduce sticking, and lock yolk texture. Use these rapid cooling and peeling techniques to innovate your process.
- Chill: 5–10 minutes in ice water to contract the white and loosen the egg membrane.
- Tap-and-roll: crack gently, roll to fracture shell, then peel under cold running water to guide membrane release.
- Store briefly: keep peeled eggs in cold water for service to maintain ease and texture.
Adopt these precise steps and you’ll routinely remove shells cleanly, efficiently, and with minimal waste starting now.
The Ice Bath: Timing and Technique
When the timer goes off, transfer the eggs at once into a bowl of ice water to stop carryover cooking and set the whites—this shock is what makes peeling easy. You’ll aim for an ice bath temperature near 32–40°F (0–4°C); colder is better but avoid freezing the shell. Use enough ice and water that the mass and temperature don’t drift as eggs go in. Timing precision matters: cool large eggs for 10–12 minutes, medium for 8–10, and smaller for 6–8, then test one. Keep eggs submerged; circulating the water or stirring briefly equalizes cooling. Don’t nap the process—prolonged cooling beyond 20 minutes can introduce condensation that complicates storage. When you’re done, dry and refrigerate within two hours if you won’t peel immediately. This method minimizes residual heat, stabilizes the protein network, and gives you consistent results you can iterate on. Adjust based on altitude and egg freshness regularly.
Cracking and Rolling: Peeling Shortcuts That Work
After cooling, you’ll tap the egg firmly on a hard surface to create an even cracked shell. Then you roll it under your palm to loosen the membrane and open a clear pathway for peeling. Start at a firm crack and gently lift the shell away so you don’t tear the white.
Tap and Roll Method
A sharp tap on the counter and a quick roll across it create a web of cracks that loosens the shell. You use the tap technique to initiate controlled fractures, then apply a confident rolling motion to widen them. Hold the egg gently, not squeezing; aim for even pressure so membranes stay intact. This method reduces pitting and speeds peeling.
- Tap: strike evenly around equator.
- Roll: press and roll with thumb.
- Peel: lift shell from larger crack.
You’ll find the process repeatable and efficient; it scales from single eggs to batches. Practice a few times and you’ll refine pressure, timing, and angle for consistently faster, cleaner results each session soon.
Firm Crack, Gentle Peel
Although it looks aggressive, give the shell a firm, controlled crack and then peel gently to separate shell from membrane with minimal pitting. You’ll use a firm crack, then a gentle peel, to exploit the thin air layer and loosened membrane. Focus on one small entry point, slide under membrane, and work around; this limits jagged shell fragments and speeds egg shelling. These peeling techniques scale from single eggs to batch workflows, and they pair well with rolling or chilled shocks.
| Step | Action |
|---|---|
| 1 | Tap center |
| 2 | Roll gently |
| 3 | Peel from crack |
Practice, record results, iterate—innovate your routine to optimize yield and consistency. Measure time, note temperature, refine pressure, and adapt tools; repeat until your egg shelling becomes reliably fast, flawless everyday use.
Peeling Under Water and Other Tricks
Peel hard‑boiled eggs under cold running or submerged water so the liquid slips between the shell and membrane and helps the shell lift away; you’ll also get better results by cracking the shell all over, gently rolling the egg to loosen fragments, levering pieces out with a spoon, or adjusting the cooking water with a bit of baking soda or vinegar. Use water to separate membrane cleanly, and test a single egg to refine timing based on egg freshness and your altitude. Try these quick tricks to streamline peeling and innovate your routine:
Peel hard‑boiled eggs under cold running water; crack, roll, use a spoon, or add vinegar/baking soda to ease peeling.
- Crack‑and‑roll: score shell, roll to loosen.
- Spoon‑lever: insert a teaspoon between shell and white, rotate.
- Acid or alkali tweak: add teaspoon vinegar or baking soda to pot.
Adopt, measure, compare. Track results, adjust boiling duration and cooling. These peeling tips are efficient, repeatable, and designed for experimentation. Iterate quickly and report findings.
Storing, Reheating, and Using Peeled Eggs
Once you’ve mastered reliable peeling, plan how you’ll store, reheat, and use the eggs to preserve texture and food safety. Store peeled eggs in a sealed container with a damp paper towel to maintain humidity, label with date, and keep in the coldest part of the fridge; storing peeled eggs this way extends freshness to about one week. For reheating eggs, avoid microwaves that rubberize whites—gently warm whole eggs in simmering water for one to two minutes or slice and briefly pan-warm with a lid. When using leftovers, think beyond sandwiches: chop into salads, blend into quick deviled eggs, or pulse into a protein-rich dressing. Apply seasoning tips to revive flavor—spritz citrus, finish with textured salts, or add an herb oil. You’ll reduce waste, preserve texture, and deliver consistent results when you adopt these small systems for storage, gentle reheating, creative reuse, and targeted seasoning for daily planning.