When a spill hits, you need to act fast and follow a methodical approach that protects fibers and prevents set stains. You’ll blot, test, apply targeted cleaners, and rinse in precise steps. Use the right tools and pH‑appropriate solutions so you don’t make the stain worse. Keep going to get the exact procedures for common stain types.
Key Takeaways
- Blot fresh spills immediately with a clean white cloth; press don’t rub to prevent fiber damage and spread.
- Identify stain type and test any cleaner in an inconspicuous spot before full application.
- Use pH-balanced cleaners for general stains, enzymes for organic stains, oxidizers for dye stains, and solvents for oils.
- For grease, absorb first with cornstarch or baking soda, vacuum, then spot-treat with a tested solvent and rinse.
- If stains soak to backing, smell persists, or DIY fails, hire certified professionals with extraction equipment and pre/post testing.
Why Acting Fast Matters
If you don’t address a fresh spill immediately, the stain will chemically and physically bond with carpet fibers, making removal exponentially harder. You must neutralize the chemical interaction before capillary-driven stain absorption completes; every minute increases penetration depth and fixes chromophores. Adopt a protocol that prioritizes quick response: blot, contain, and limit lateral migration to prevent wicking into backing. Measure progress visually and by touch, adjusting method if residues persist; prolonged agitation can drive particulates deeper, so use controlled motions. Temperature matters — warm solutions can mobilize soils but may set protein-based stains, so choose actions based on stain chemistry. Track elapsed time and environmental conditions; humidity and pile type alter dwell time and efficacy. Your objective is to minimize contact time between stain constituents and fibers, preserving carpet integrity and reducing need for invasive restoration. Act decisively; innovation lies in timing and method selection, not in hesitation.
Tools and Supplies You’ll Need

You’ll need a kit of basic cleaning tools: a strong vacuum, stiff and soft-bristled brushes, microfiber cloths, and a spray bottle. Choose stain removal solutions by chemistry—enzyme cleaners, a neutral-pH carpet shampoo, and specialized spotters for grease, dye, or protein stains. Put on protective gear like nitrile gloves and goggles, and have accessories ready: disposable towels, plastic sheeting, and a wet/dry vacuum.
Basic Cleaning Tools
Equipment and supplies determine how effectively you remove carpet stains, so assemble a compact kit before you start. You’ll want a high-efficiency vacuum with routine vacuum maintenance protocols—clean filters, inspect beater bars, and calibrate suction—to remove loose debris and protect fibers. Include stiff and soft carpet brushes for agitation; alternate brushes based on pile height to avoid abrasion. Add absorbent microfiber towels and a handheld extractor or pump sprayer for controlled liquid handling. Use a flat-edged scraper and a narrow-tip spatula for solid residues, plus disposable gloves and a small LED inspection light for contrast detection. Choose modular, durable tools that you can sanitize and upgrade; think modular heads, corrosion-resistant materials, and ergonomic handles to optimize speed and precision. Log metrics after each job.
Stain Removal Solutions
Gather a compact chemistry kit so you can match stain types with the right agent: a pH‑balanced carpet shampoo for routine soils, an enzymatic cleaner for protein and organic stains (blood, vomit, pet messes), a peroxide‑based oxidizer (3–6% H2O2) for many food and beverage stains, a solvent spotter for oils and greases, and an acid/rust remover for mineral deposits — plus distilled water and white vinegar for rinsing and pH adjustment.
You should also include calibrated spray bottles, microfiber blotters, a soft-bristled brush, a calibrated measuring spoon, and test strips for pH control. Use these for targeted, innovative DIY solutions and stain prevention tips. Inspect fibers, test in an inconspicuous area, and document concentrations.
- Calibrated spray bottles
- Microfiber blotters
- Soft-bristled brush
- pH test strips
- Measuring spoons
Protective Gear and Accessories
Because some stain removers are corrosive, toxic, or volatile, you should always use appropriate personal protective equipment: chemical-resistant nitrile gloves, splash goggles, and an N95 or respirator with organic vapor cartridges when using solvents or peroxide at higher concentrations. You’ll also want disposable lab-style aprons, shoe covers, and a well-ventilated workspace or local exhaust to control fumes. Select protective gloves that resist solvents and peroxides; test compatibility charts for the active chemical. Fit safety goggles snugly and choose splash-resistant models rated to ANSI Z87.1. Use colorfast swabs, microfibre cloths, and nonmetallic scrapers to avoid fiber damage. Keep a calibrated spray bottle, pH test strips, and neutralizer on hand. Label containers and store concentrated agents in secondary containment to support safe, innovative stain-removal workflows procedures.
General Spot‑Cleaning Steps
When a spill happens, act quickly to limit penetration and color transfer. You’ll follow a repeatable protocol that emphasizes cleaning techniques and stain prevention while minimizing fiber disturbance. Start by blotting—never rubbing—to lift surface liquid. Test any solution in an inconspicuous area first. Use cool water for organic spills; use a neutral pH cleaner for synthetic dyes. Apply solutions sparingly and work from the carpet edge toward the center of the stain.
- Blot with a white absorbent cloth, pressing gently
- Apply minimal cleaner, wait thirty to sixty seconds, blot again
- Rinse area with clean water to remove residues
- Blot dry and air-dry with a fan or low heat
- Reassess pile direction; groom with a spoon or brush
You’ll document results and adapt concentrations for persistent stains, iterating until the fiber and backing show no residue. Track time and product used for future optimization.
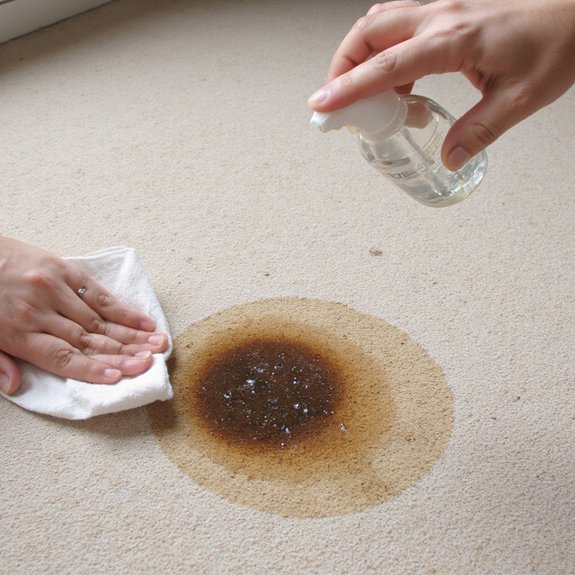
Removing Coffee and Tea Stains
Coffee and tea leave tannin-based stains that set with heat, so act fast and use cool solutions. Blot immediately with a clean, dry microfiber; don’t rub and don’t use hot water. If solids remain, lift coffee grounds with a spoon or vacuum peripheral particles before blotting. Prepare a neutral pH detergent solution: one teaspoon mild dish soap per pint of cool water. Apply sparingly with a spray or cloth, blotting toward the center. For persistent tannins, mix one part white vinegar with two parts cool water and test an inconspicuous area first; blot, then rinse with cool water and blot dry. For brewed-tea spills from tea bags, open the bag and remove leaves if present, then follow the same blot-and-spray protocol. Use a nozzle or handheld extractor for deep contamination. Finish by placing weight over absorbent towels until carpet is dry to prevent wicking and fiber distortion issues.
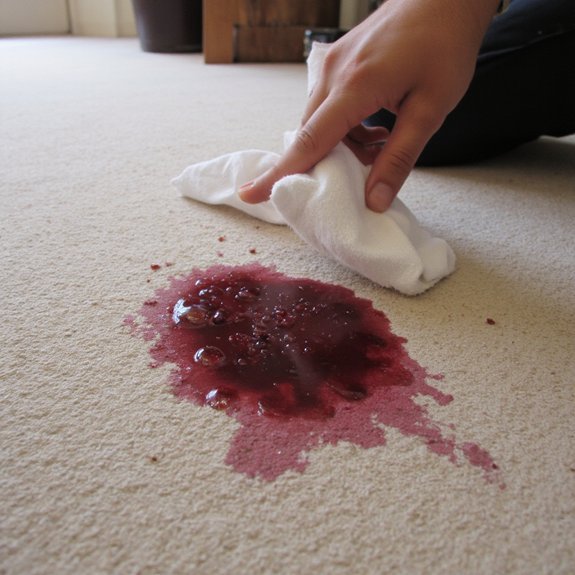
Removing Red Wine and Juice Stains
Although red wine and fruit juices differ chemically, they both deposit strong pigmented chromophores and sugars that sink into fibers, so you must act fast and avoid heat or scrubbing. You’ll blot immediately with a clean absorbent cloth, work from edges inward, and use a cold-water dilution to prevent chromophore fixation. For stubborn stains, deploy an oxidizing agent diluted per label directions or an enzymatic pre-spray designed for colored organic dyes. Follow with controlled extraction and low-temperature drying to protect fiber integrity.
- Blot excess immediately; don’t rub.
- Apply cold-water dilution; blot again.
- Test oxidizer on an inconspicuous area.
- Use targeted enzymatic spray for juice removal.
- Extract with low-pressure, cool water.
Document each step, monitor for dye migration, and iterate with minimally invasive chemistry to preserve pile and colorfastness. Adopt data-driven protocols and record outcomes to optimize formulations, reducing rework and enhancing long-term carpet resilience and client satisfaction metrics.
Treating Pet Accidents and Odors
You should act immediately: blot solids and moisture with paper towels, lift rather than rub, and apply a dilute white vinegar solution to neutralize fresh urine. After initial cleanup, rinse with clean water and blot dry to remove residue and prevent wicking. Use a targeted enzyme cleaner—enzymes break down organic proteins and odors at the molecular level, so follow manufacturer dwell time and avoid harsh chemicals that inactivate them.
Immediate Cleanup Steps
When a pet accident happens, act fast: blot solids with a paper towel or dull spatula, then press a clean cloth into the stain to absorb as much liquid as possible without rubbing, which will spread stain and damage fibers.
You’ll then identify stain types briefly, test a small area, and apply targeted cleaning techniques to avoid pushing soil deeper. Use cool water and minimal solution; repeat blotting until transfer stops. For odors, ventilate and use absorbents. If residue persists, schedule deeper extraction.
- Blot; don’t rub.
- Remove solids mechanically.
- Test cleaner on edge.
- Use incremental solution dilution.
- Repeat blot-extract cycles.
Document steps to optimize future responses and reduce recurrence. Track product, dwell time, and temperature data to refine your protocol and accelerate mitigation now.
Enzyme Cleaners Explained
Break down pet stains at the molecular level with enzyme cleaners that digest the organic compounds causing both visible soil and odor. You’ll choose formulations based on enzyme types—proteases for urine and fecal proteins, lipases for greasy residues, and amylases for carbohydrate-based spills. Understand enzyme functions: they catalyze hydrolysis, lowering activation energy to convert macromolecules into soluble fragments you can blot or extract. Apply per label: pre-test, saturate the soiled area, allow dwell time for catalysis, agitate lightly, then blot and rinse. For persistent odors, repeat cycles or use an oxidizing adjunct after enzymatic action. Store enzymes refrigerated when specified to preserve activity. By selecting targeted enzyme functions and following protocol, you’ll remove stains and neutralize odor at the source. Maintain equipment for consistent results.
Dealing With Grease, Oil, and Makeup
Grease, oil, and makeup are solvent-driven stains that penetrate carpet fibers quickly, so you’ll act fast and deliberately: blot excess with a clean white cloth, sprinkle an absorbent like cornstarch or baking soda and let it sit 10–15 minutes, then vacuum to lift surface oil. Use targeted solvent application for residual residue, testing an inconspicuous area first to avoid dye migration; this optimizes grease absorption and promotes controlled oil degradation. Work from carpet edge toward center to prevent spread, and use low agitation to protect pile.
- Apply absorbent, wait, vacuum.
- Test solvent on hidden area.
- Use minimal solvent; blot don’t rub.
- Rinse with distilled water; blot dry.
- Repeat controlled cycles; allow dwell time.
Document solvent used for future maintenance, and finish by airing the area and inspecting fibers under directional light to confirm stain removal and fiber integrity. Note timing precisely to avoid over-saturation and pile distortion. always.
When to Call a Professional Cleaner
If stains cover more than a localized spot, have soaked into the backing, or haven’t responded to controlled, repeatable treatments, call a professional cleaner. You should engage professional services when contaminants are hazardous (biofluids, pesticides), when odor persists despite neutralization, or when pile distortion and dye migration threaten fiber integrity. Professionals deploy calibrated extraction, encapsulation polymers, low-moisture systems, and enzyme blends you won’t replicate safely at home. Before scheduling, verify technician certification, equipment specifications, and a remediation plan detailing methods and expected outcomes. Assess cost considerations up front: get written estimates that separate labor, materials, testing, and potential restorations. Ask about warranty, follow-up inspection, and recovery time. If you need data-driven results, insist on pre- and post-treatment moisture and chromatographic tests. Calling a pro is an investment in preserving textile value and indoor air quality when precision, safety, and measurable performance are priorities, and long-term cost savings, too.